Dual boot Arch Linux and Windows the right way
23 Sep 2019 - John
A while ago, I wrote an article about how awesome it is to run Linux. Since then, a few people have asked me for a quick guide on how to do it. I use the Arch Linux wiki myself, but I find it intimidating for newcomers, so I decided to write a simplified guide. You will need two flash drives, a computer capable of UEFI booting and secure boot disabled.
What is dual booting?
Dual booting refers to the practice of having two or more operating systems living on your computer and choosing which one you’ll be working with for the current session. None of them have a clue about the existence of the other ones, so this makes for a great way to have different environments, like Windows for gaming and Linux for coding, for example. This is accomplished by a little program called the bootloader. It’s the first thing that runs when you turn your computer on. It sits at the very beginning of your hard drive and its only task is to look for any operating systems and launch them. If you’re used to working on Windows, this process is invisible to you, but there are many bootloaders out there that can launch both Windows, Linux, and depending on your hardware, macOS.
Why Arch Linux?
In a nutshell, bloat. I like an extremely lean environment made out of just the packages I want and Arch offers that. It comes with barely any packages and you have to install what’s missing yourself, so this lets you have an incredibly customizable system right from the start.
Isn’t Arch super difficult to install?
Not really, you can go from zero to full blown desktop in about 15 minutes. The problem is there are so many ways of doing it and so many different guides with different goals that it makes the process look intimidating. This guide breaks down the process into simplified steps with illustrations to keep you on the right path. There will be many, many steps, but most of them are just quick and simple one liner commands that I will explain. Let’s get to it!
Download all necessary software and prep the flash drives
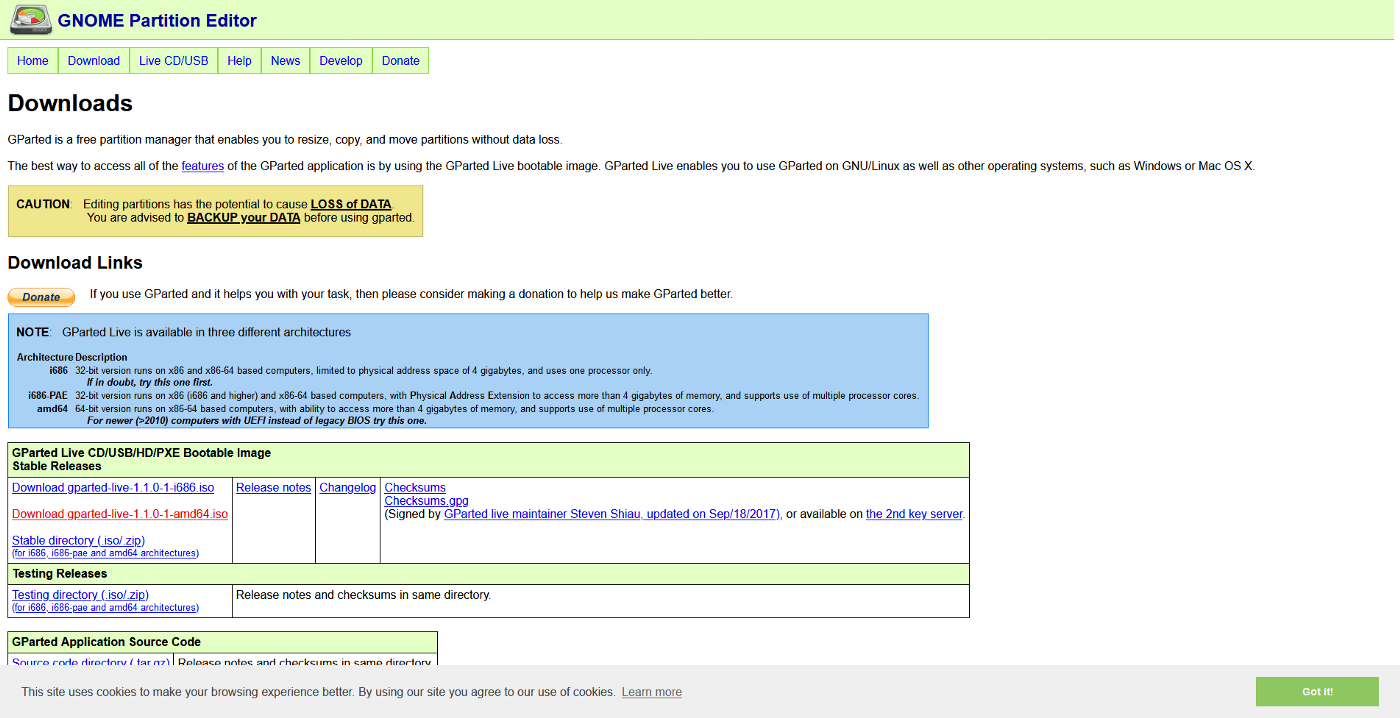
You will need to download Rufus to burn your images to the flash drives. Then you need to download GParted. Go to their download section and download the amd64 .iso file. Should be the second link:
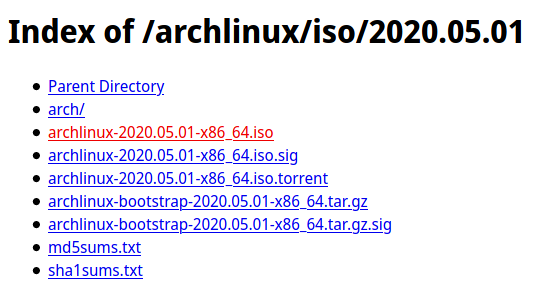
Then we need the actual Arch Linux iso file. Go to their website, click on the download link in the top right corner and then choose a mirror that’s close to you. You’ll most likely end up in a directory listing, be sure to click on the .iso that has no other extensions. It should be around 650mb:
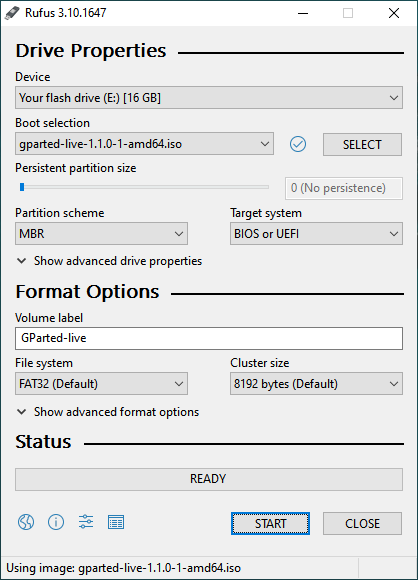
Now we need to flash both images to our flash drives. Launch Rufus and select your flash drive in the Device list. Then click on the SELECT button and double click on your GParted iso file. Leave all other options at their defaults and click on START:
If you get any warnings or suggestions during the process, accept them and wait for a couple of minutes. When the process is done, click on close, eject the flash drive and repeat the process with the other flash drive and the Arch iso. In both cases, Windows will complaint that the drives need to be formatted. This happens because the flash drives are now in a format that Windows can’t understand, so ignore the warning, do not format and keep going.
Partition the hard drive
There are a million ways to do this and most Linux pros just do it from a command line application, but I believe that doing it in a graphical way helps newcomers understand what they’re doing instead of blindly repeating the steps in a guide, so we’re going to do it using graphical apps.
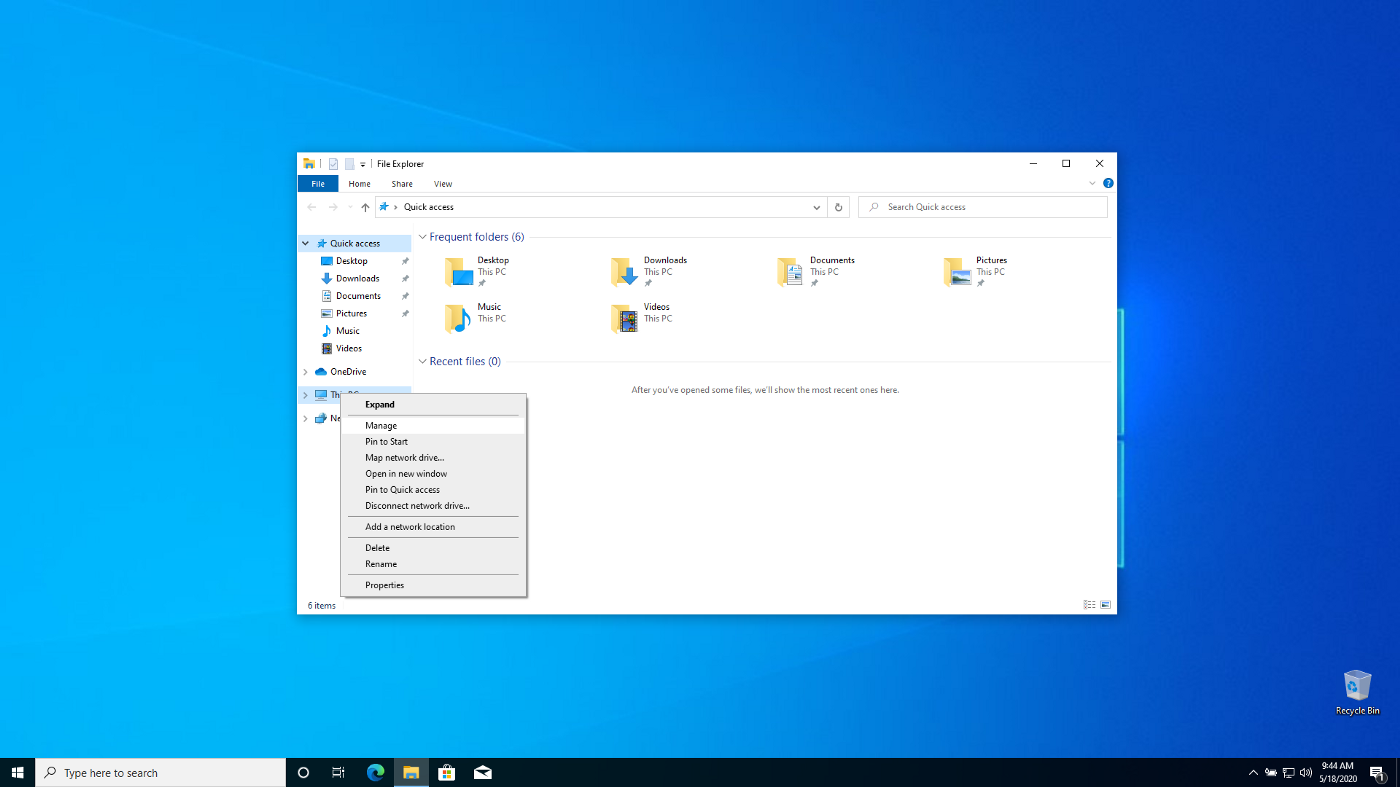
While on Windows, open a file explorer and right click on This computer, then right click on Manage:
This will take us to the computer management app. Click on Disk management in the left menu:
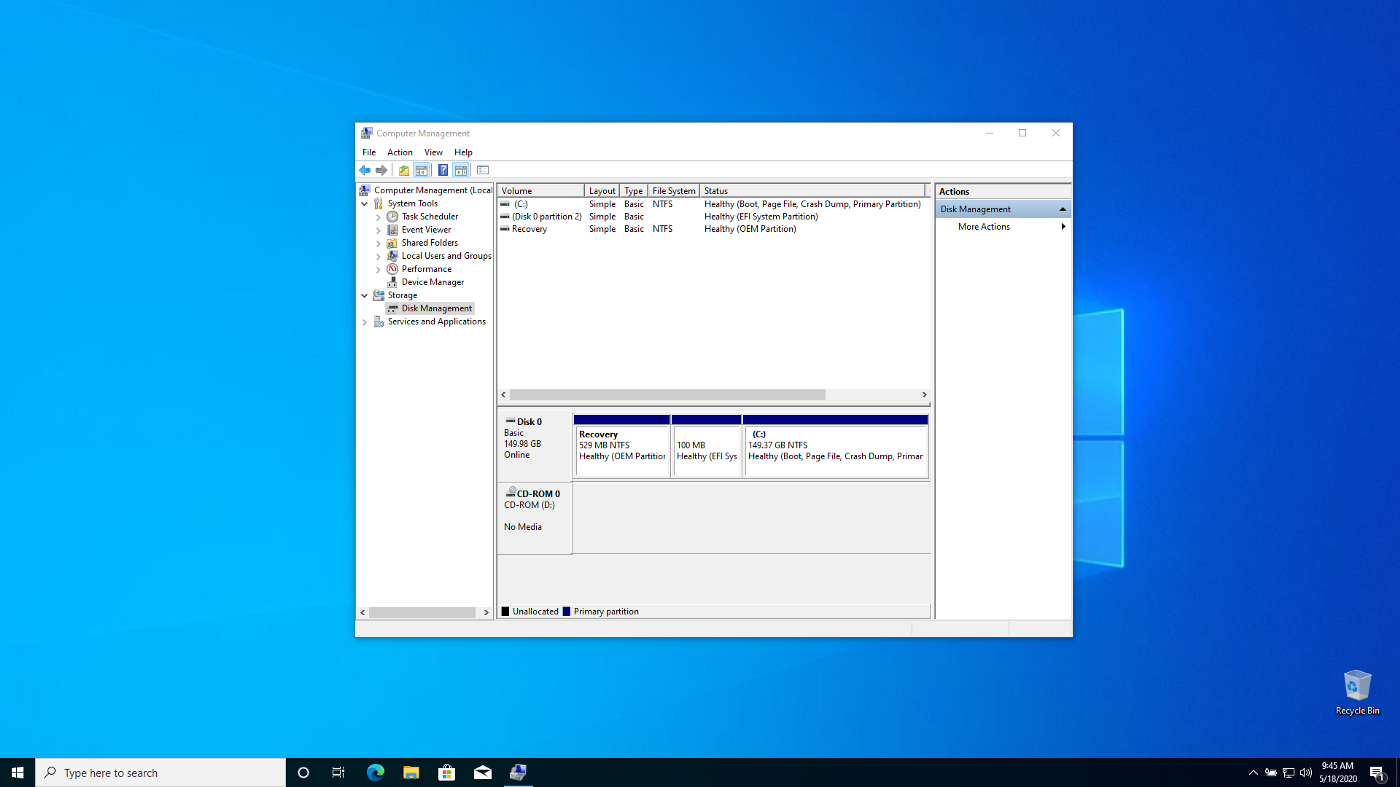
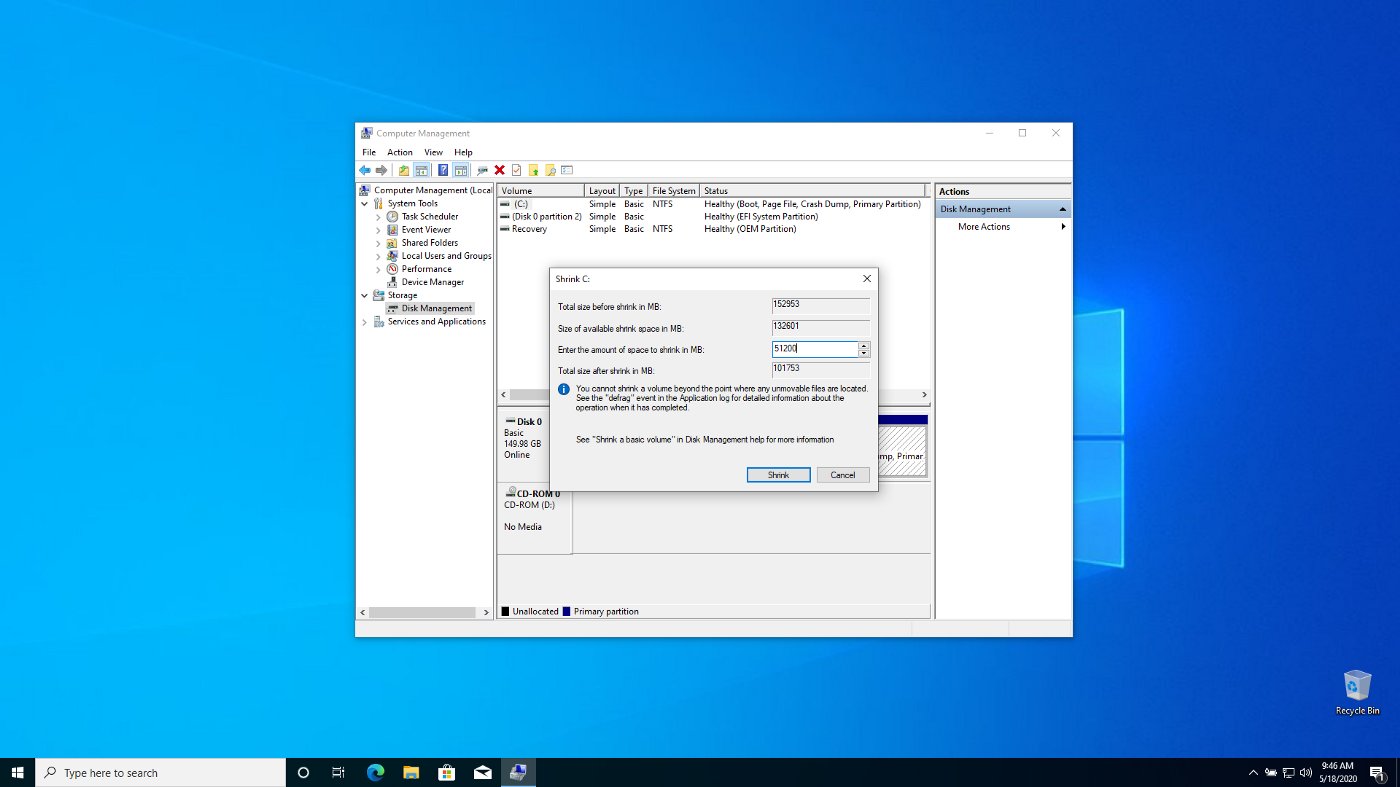
Take a look at Drive 0 at the bottom. This is your hard drive, and each one of its sections represents a partition. See the one in the middle? That’s the bootloader partition. We’ll come back to it later, but right now, what we want to do is shrink the Windows partition so that we have space available for our Linux install. So right click on your Windows partition (it should be the largest) and click on Shrink volume. A new window will pop up asking how much you want to shrink the partition. The sizes are expressed in megabytes and I want to give Linux 50gb, so I’ll enter 50×1024=51200:
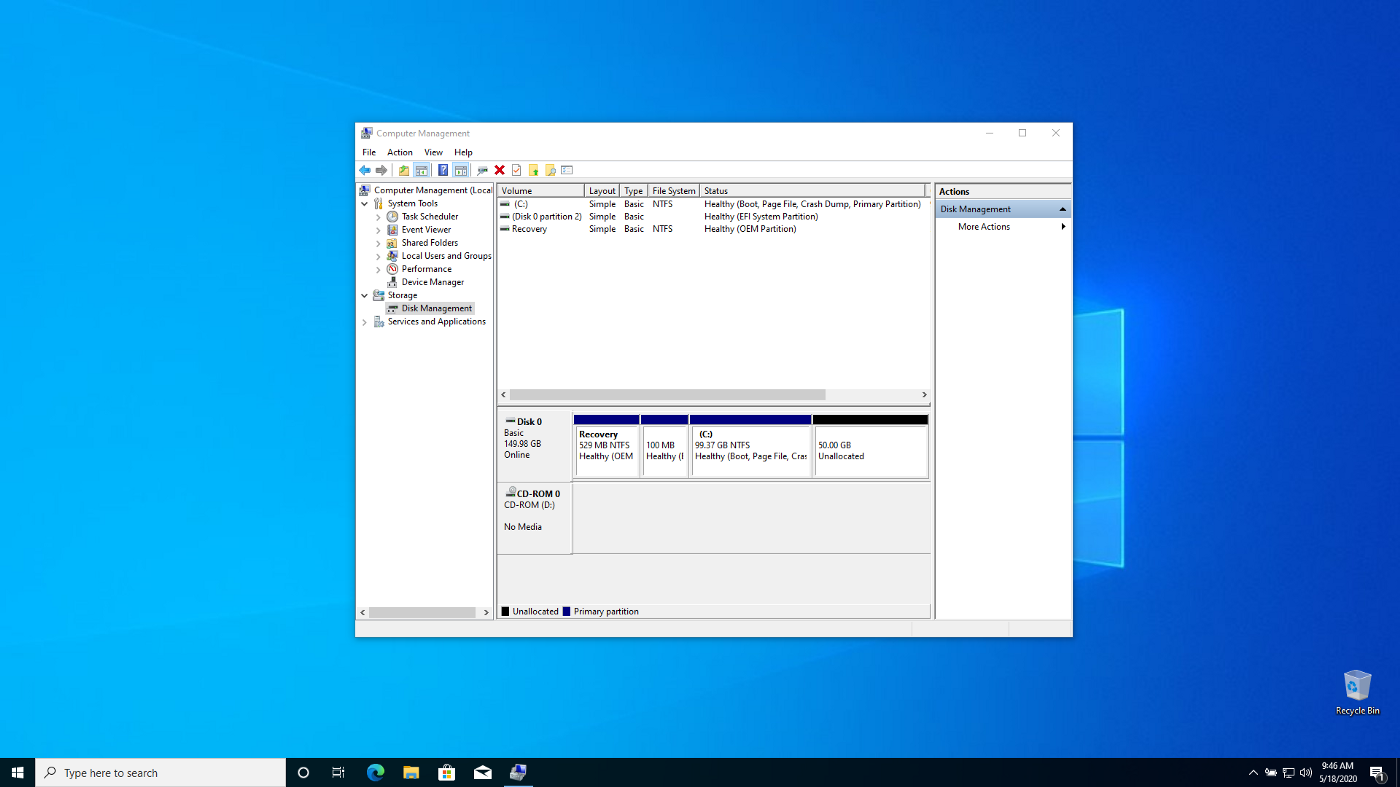
You should end up with a hard drive looking like this:
Now close the computer management app, shut down your computer and insert your GParted flash drive. Now this part is tricky and depends on your computer. We need to turn it back on without it booting into Windows, but into our flash drive. We accomplish this by using a semi-hidden feature all computers have called the boot menu. It’s a little menu that allows us to select the device we want to boot from. In our case it’s the flash drive. To get to it, you have to turn the computer on and f̶r̶a̶n̶t̶i̶c̶a̶l̶l̶y̶ quickly press on your computer’s boot menu key. The most common key is F12, but different brands have different keys, so click here to check yours. When you get to your boot menu, select your flash drive.
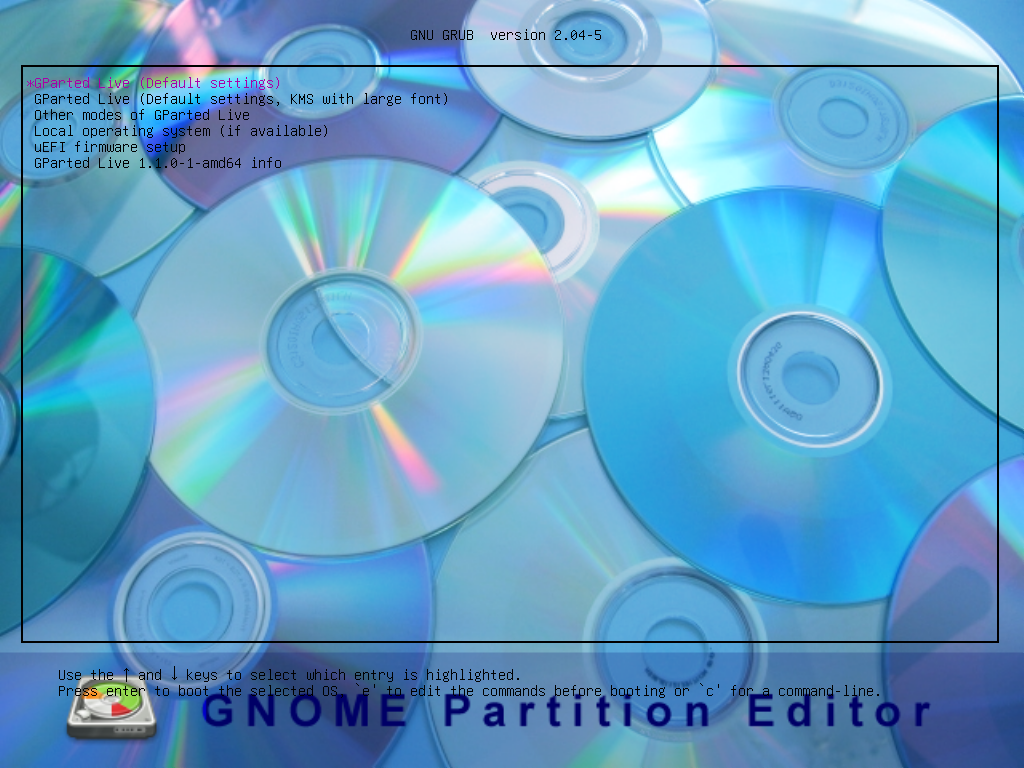
If you got to this screen, it worked. Select the first option and then press enter on every choice to accept their defaults. Since you’re working off a flash drive, things are going to be slow, but after a few seconds, you’ll land in a screen like this:
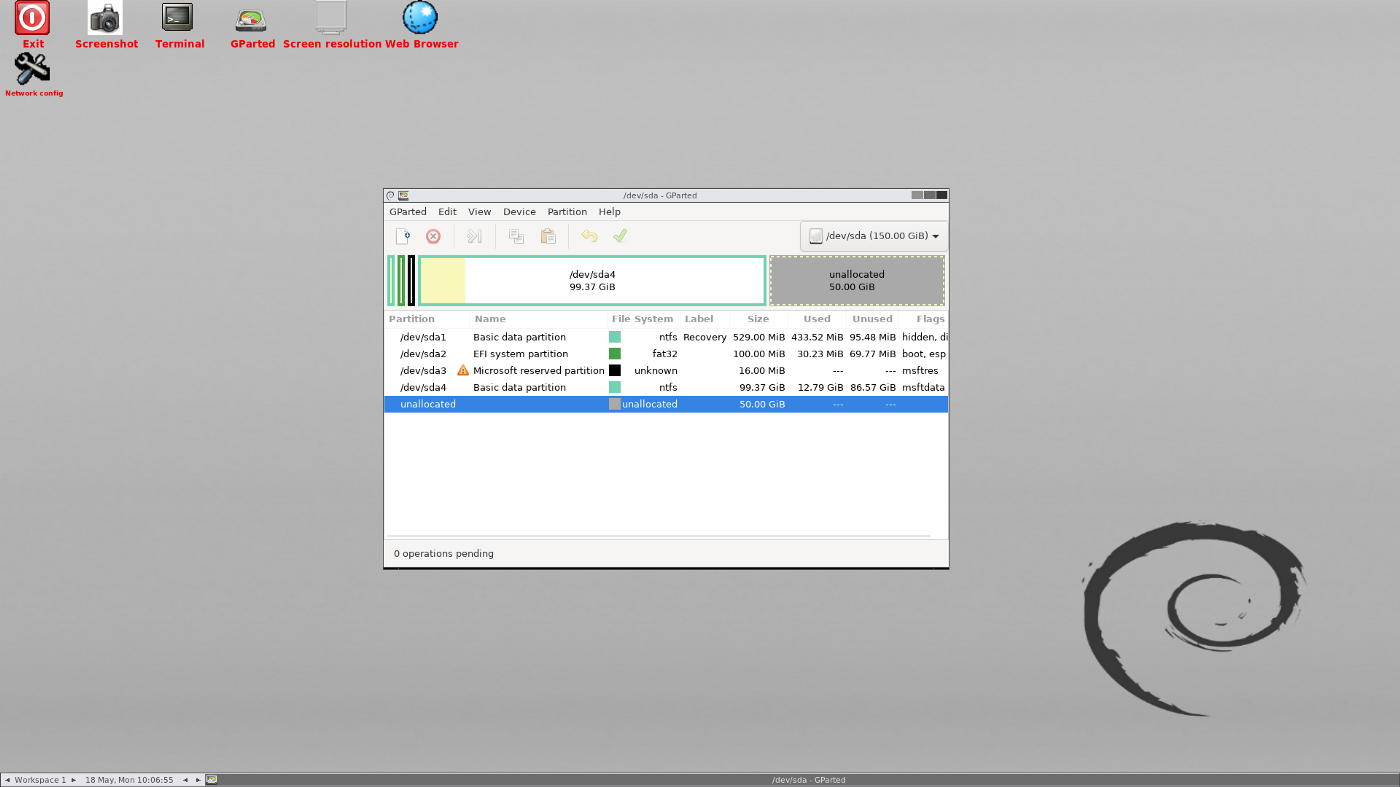
We need to create two partitions. The first one is the actual system partition, so right click on the unallocated space and click on new:
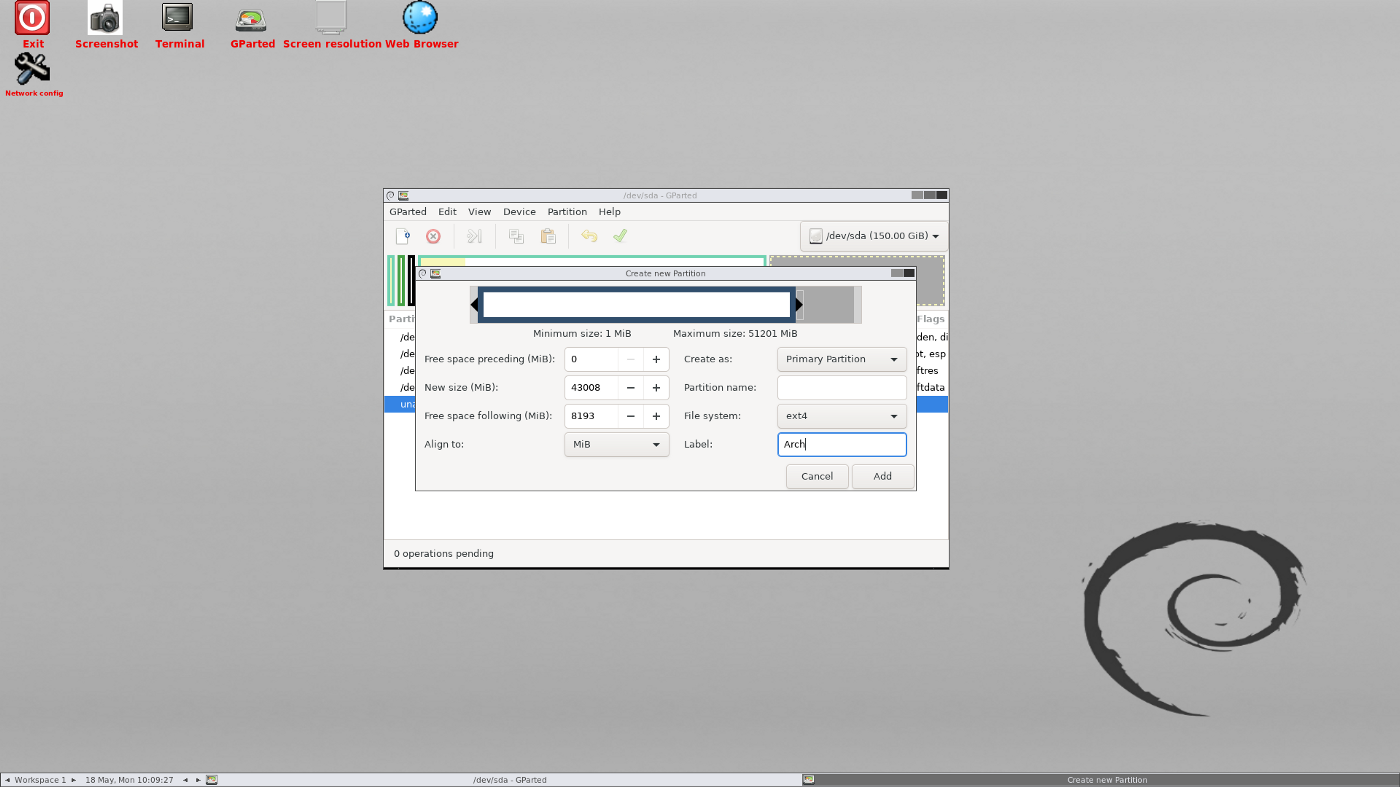
Again, the sizes here are expressed in megabytes and I want to give it 42GB, so if I multiply 42×1024 I get 43008. Select ext4 as the file system, give it a distinctive label and leave everything else at their defaults.
The other partition we need is the swap partition. It is a special area of the hard drive that your system uses to store and move information between the RAM and the hard drive. You could use a file or a partition, of which I prefer the latter. So again, click on the usused space and give it the maximum allowed (should be around 8192 if you’re using the same numbers as this guide). Then choose linux-swap as the partition type and click ok:
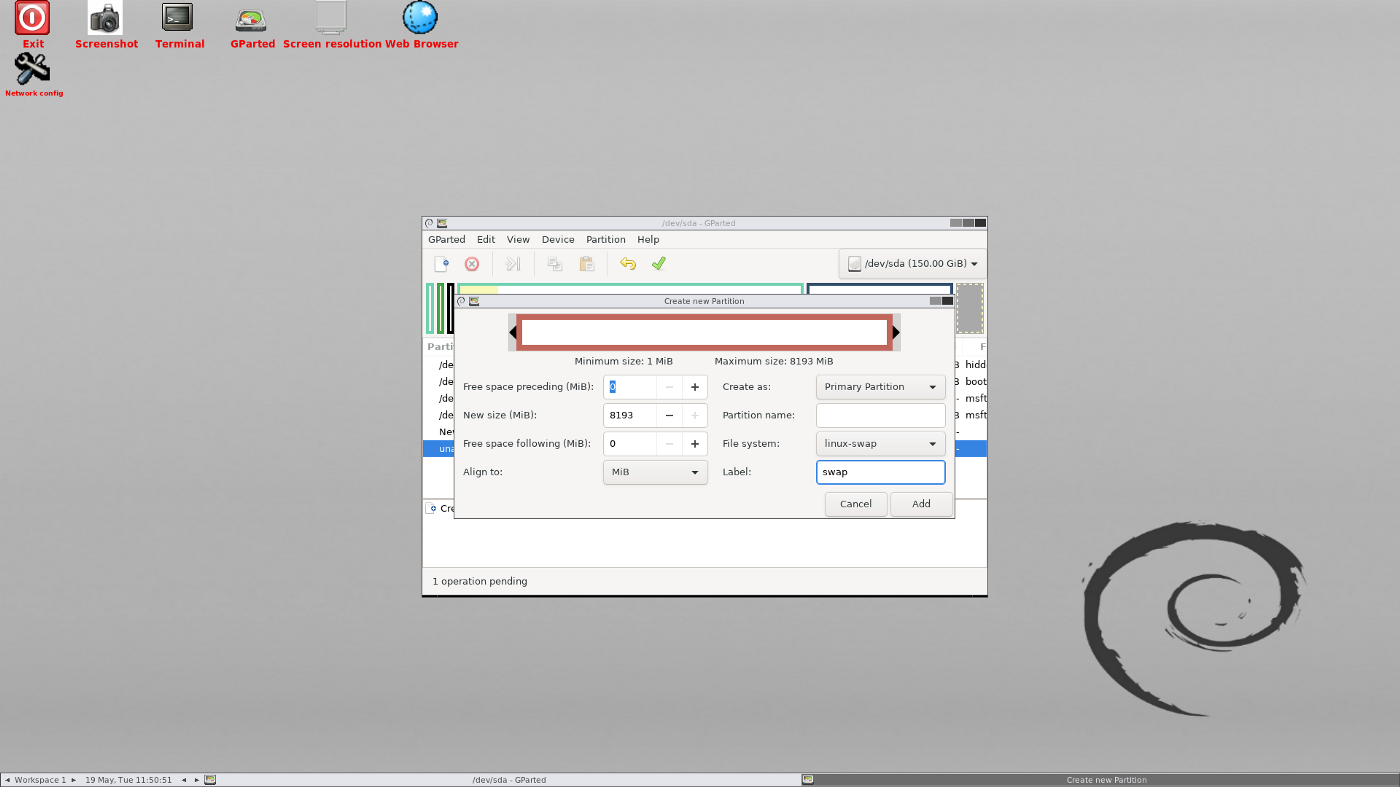
Once you’re done, click on the green checkmark icon at the top. Your changes will be applied and after a few seconds, you’ll end up in a screen like this:
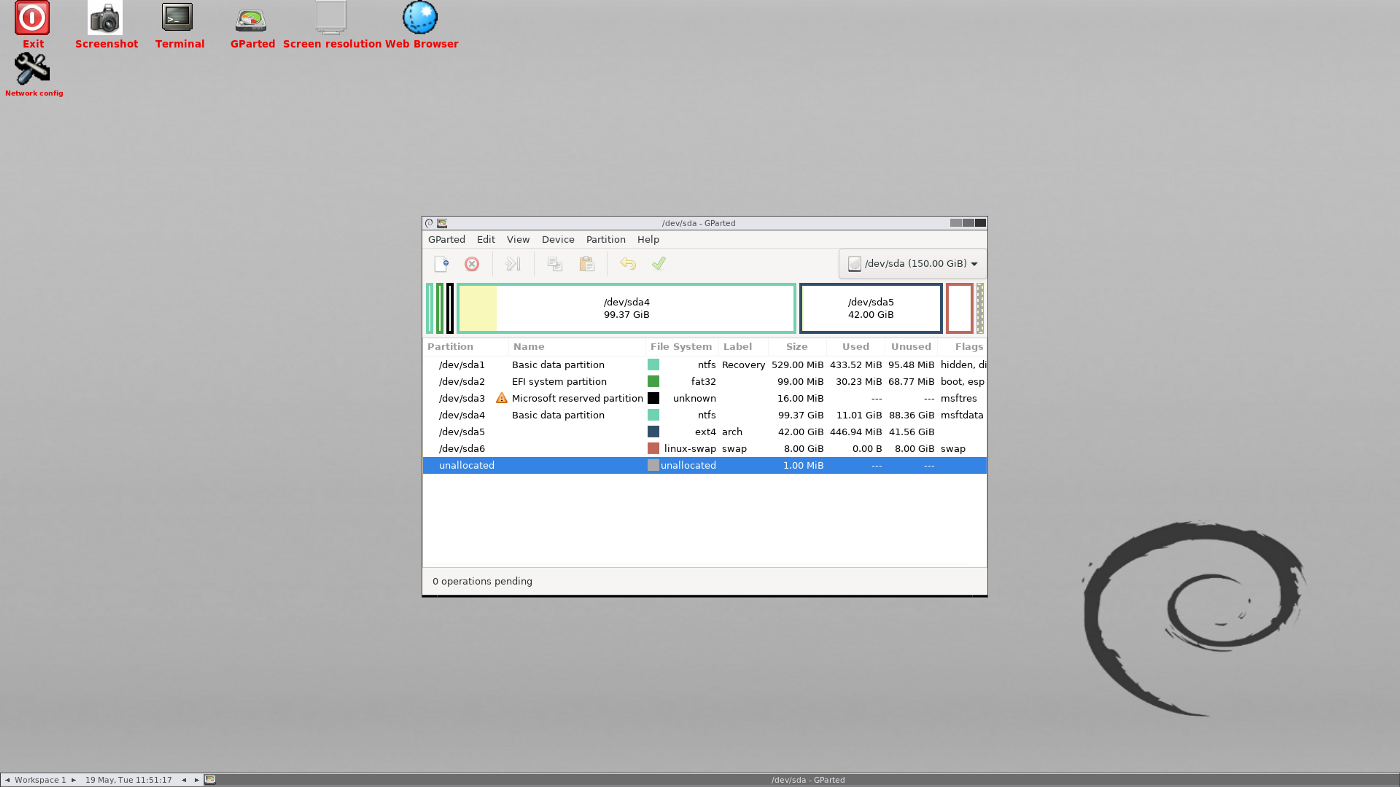
Partitions are done!
See the first column? We’re going to need these names later, so to keep things easy, remember these names:
- Your boot partition is the one that says
EFI, in our case it’s/dev/sda2. - Your main Linux partition is the one with the
EXT4file system,/dev/sda5. - Your swap partition is the one with the
linux-swapfile syste,/dev/sda6.
Now shut down your computer, unplug the GParted flash drive, insert the Arch Linux one and turn it back on. Remember to press the boot menu key to boot from USB. You’ll end up in another menu. Choose the first option and let it do its thing. After a few seconds, you’ll end up in a very simple command line:
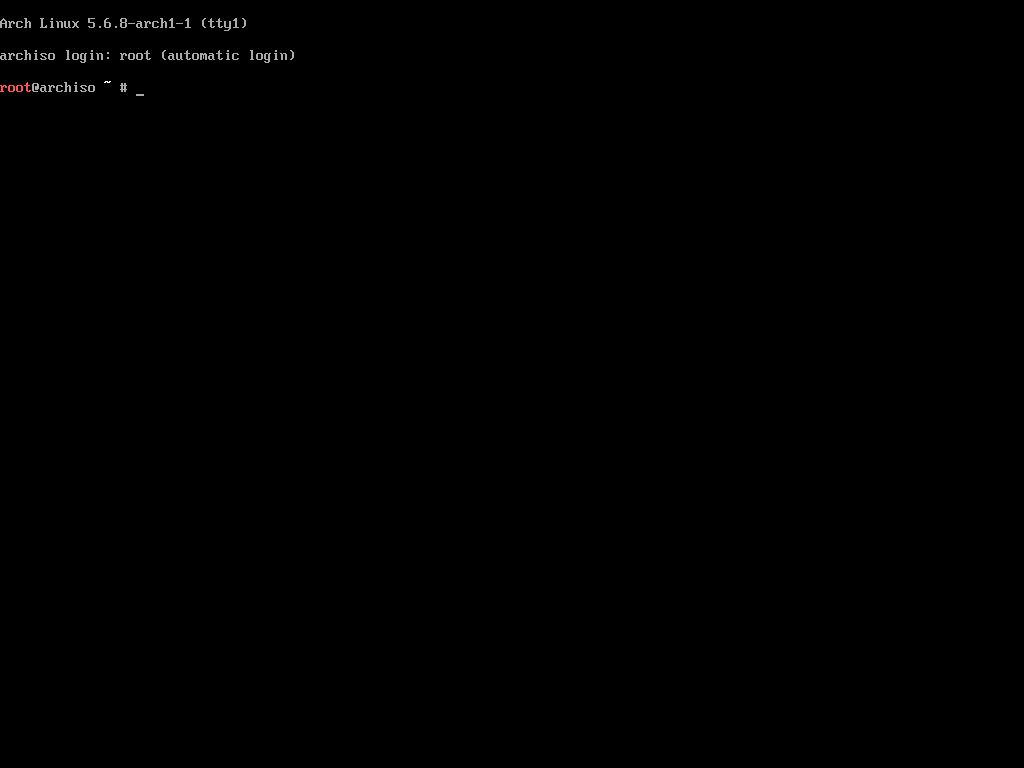
And we’re ready to start!
Arch Linux Installation
We first need to make sure that we have a working internet connection. If you’re using wifi, type wifi-menu, choose your network and enter your password. If you’re on a wired connection, you should be set. To check, enter ping www.google.com
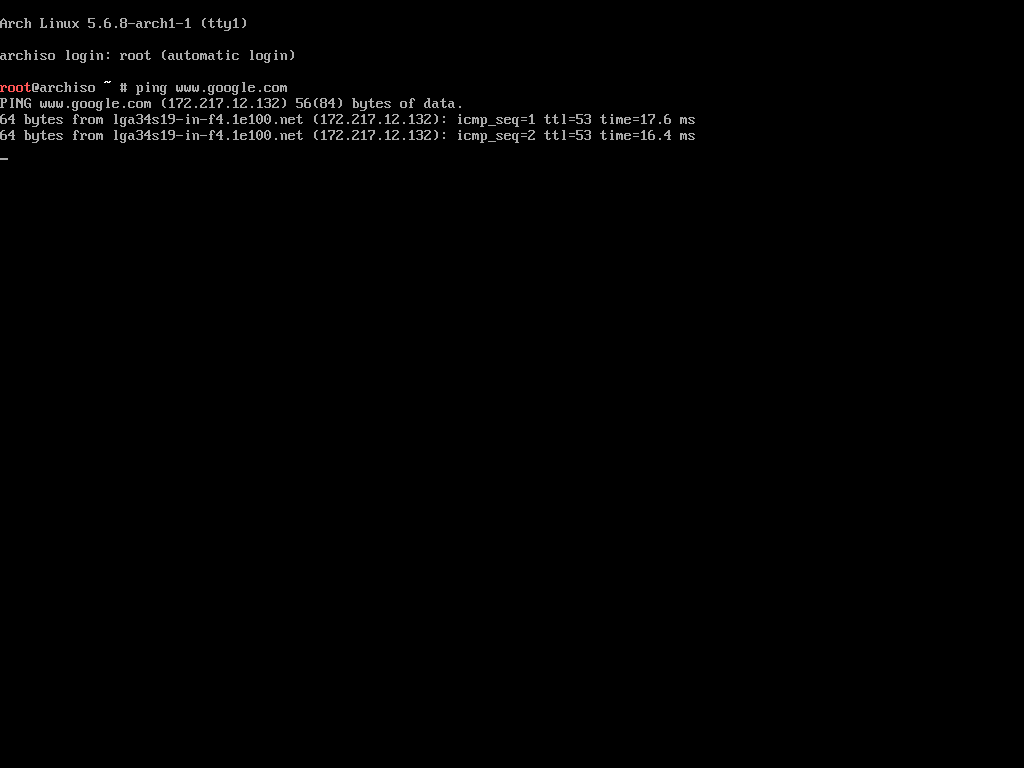
Press ctrl+c to break out of the pings. Now we need to mount our partitions. If you need a refresher on your partition layout, enter fdisk-l.
Let’s start by mounting our swap partition. Each line is one command followed by the enter key before the next one:
mkswap /dev/sda6
swapon /dev/sda6
Then we mount our main partition:
mount /dev/sda5 /mnt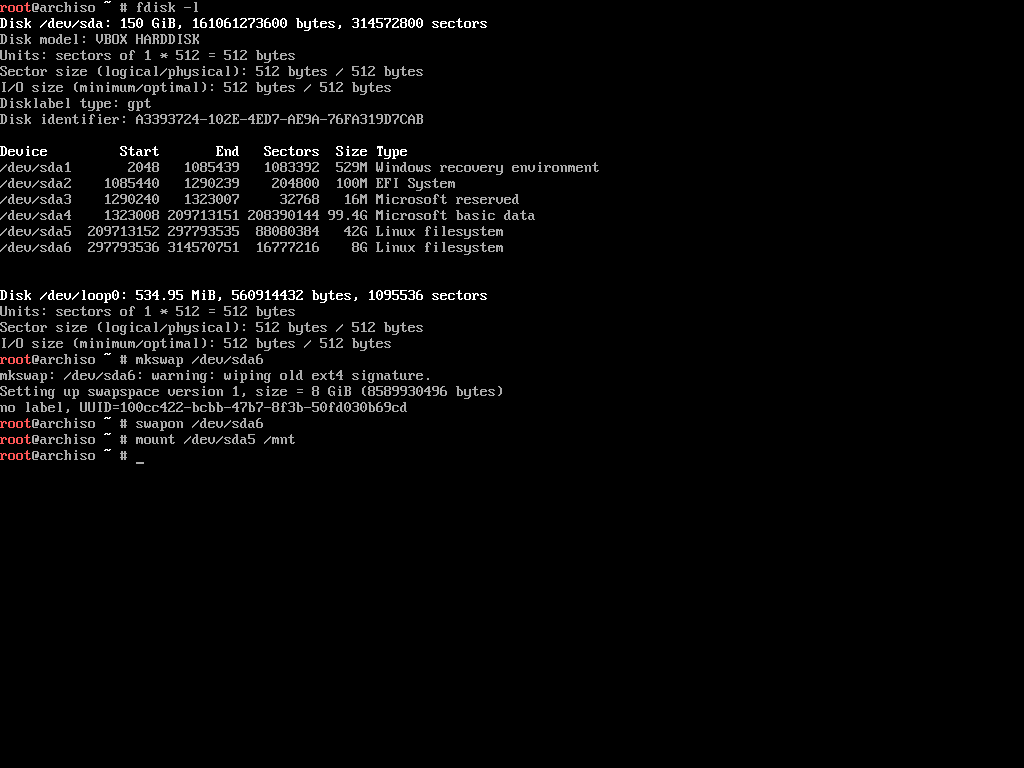
With our partitions ready, we can now proceed to install Arch. To do so, enter
pacstrap -i /mnt base base-devel nano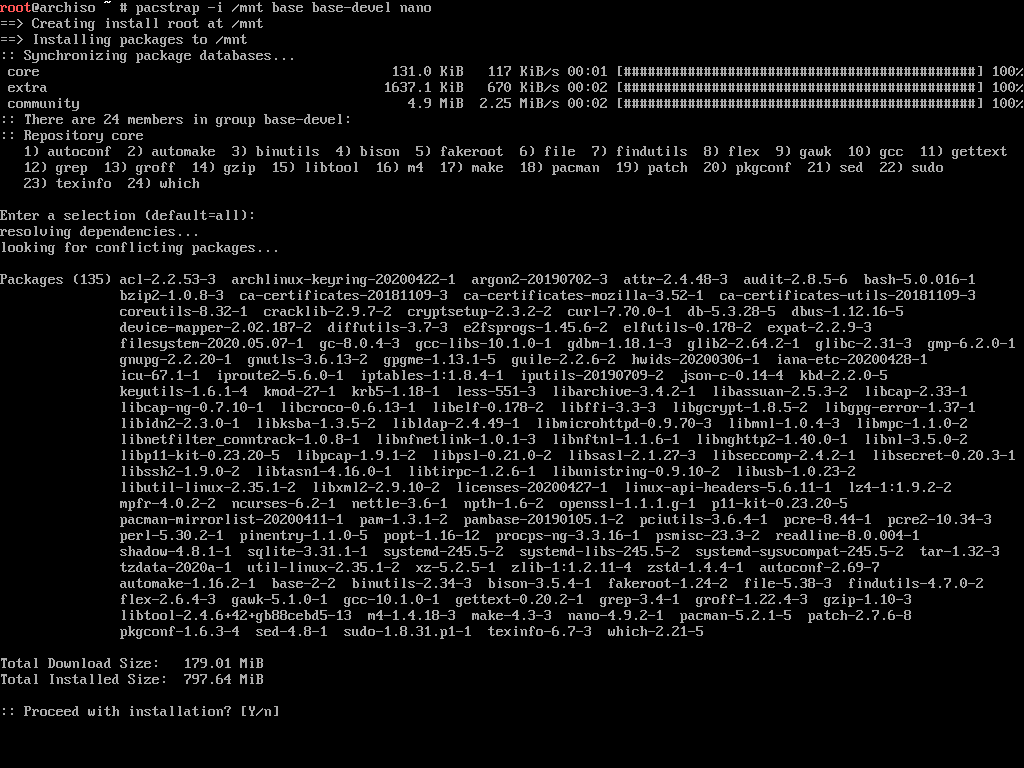
This will download all the necessary packages and install them. We didn’t mount our boot partition before so do so now:
mkdir /mnt/boot/efi
mount /dev/sda2 /mnt/boot/efi
We have all our partitions mounted, but these changes will get lost if we restart the computer, so we need to somehow save them so the system can use them upon restart. To do so, enter
genfstab -U /mnt >> /mnt/etc/fstabAfter this, Arch Linux is now installed, but we still have no users, no graphical interface, no bootloader and no kernel. Let’s take care of that.
Chrooting into our system
So far we’ve been working on a "superset" of our system, which is currently located at /mnt. This is a temporary mount point that will be gone after we’re done. This has an implication. Everything we’ve done so far is relative to our live environment. We need to get into our actual system to perform the last changes and the way to do it is chrooting into it. Enter
arch-chroot /mntand now everything you do is relative to the installed system instead of the live environment.
Generating system locale
Now ne need to generate our system locale. Enter
nano /etc/locale.genand uncomment your language of choice by removing the # symbol from its corresponding line. I am in the US, so I will pick en_US.UTF-8:
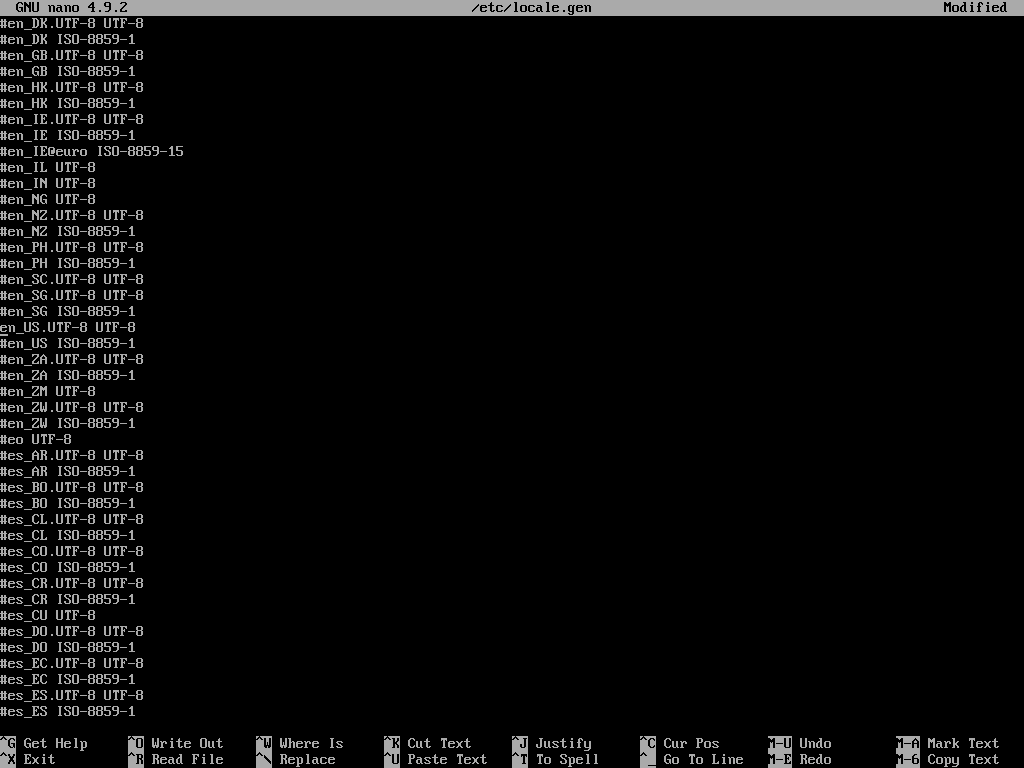
Once you’re done, press ctrl+o and then enter to save the changes, then press ctrl+x to exit nano.
Back in the console, enter
locale-gento have the system generate the locale. Then enter
localectl set-locale LANG=en_US.UTF-8to select the system language. Finally, let’s select our time zone by entering
tzselectand choosing your area. Then enter
ln -s /usr/share/zoneinfo/yourZone/yourSubZone /etc/localtime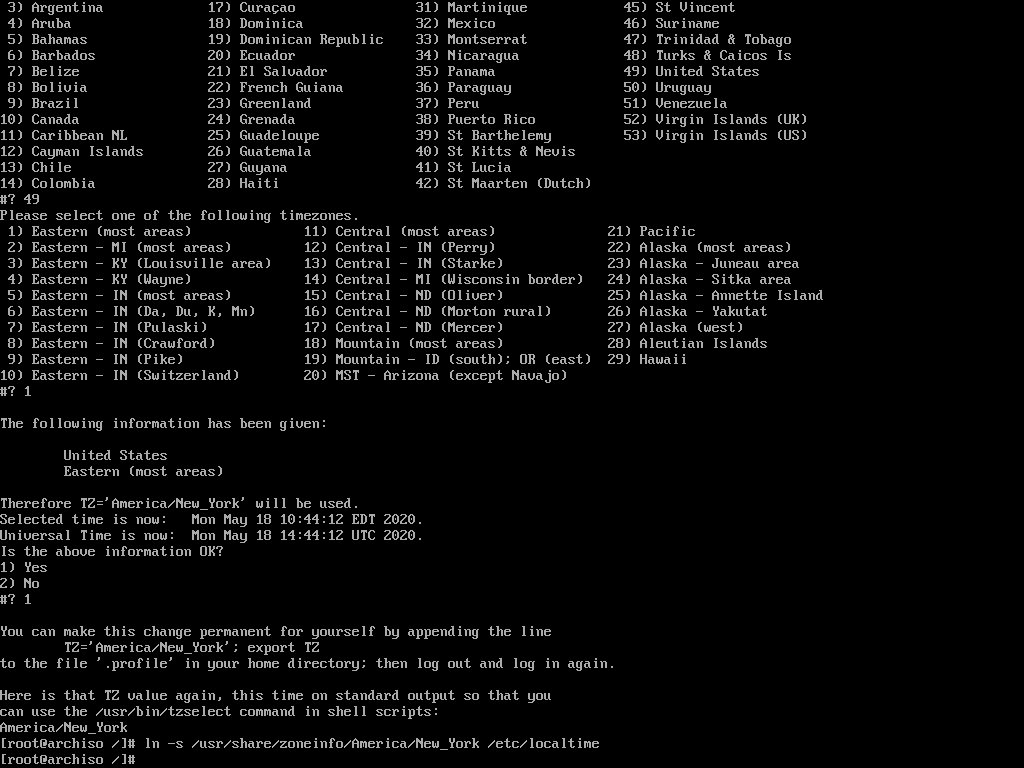
I’m in New York so I chose America/New_York
Not your old video game
Remember how we didn’t have a kernel or a bootloader? Time to install those. To do it, we make use of Arch’s package manager, known as pacman. The way it works is you enter pacman with the -S switch and the name of the packages you want to install. We need to install the kernel, so enter
pacman -S intel-ucode linux linux-firmwareIf your computer has an AMD processor, enter
pacman -S amd-ucode linux linux-firmwareThis will install all the packages needed to have a functional Linux kernel. Don’t worry if it complains about missing firmware for your hardware. When it’s done, check that it was correctly installed by entering
ls /bootIf you see a file called vmlinuz-linux, that means it worked.
Install the bootloader
With the kernel out of the way, we just need to install the bootloader. We’re going to use rEFInd because it has awesome themes and it looks nice out of the box. To install it, enter
pacman -S refind-efiand then run
refind-installThis will install all the necessary files to run the bootloader on boot. If you look closely at the output, it says
Creating //boot/refind_linux.conf; edit it to adjust kernel optionsbut there is a problem. If you open the file with nano, you can see that it saved everything relative to the live environment, even if we’re chrooted in our system. If you were to reboot, you couldn’t do anything if the Arch flash drive was unplugged, so DO NOT REBOOT and let’s fix that.
rEFInd uses our partition’s UUID to keep track of our operating system, but we can’t just copy and paste from the terminal. Luckily, we have the >> operator. It grabs whatever the output of a command and appends it at the end of a specified file. So remembering that our main partition is /dev/sda5, enter
blkid /dev/sda5 >> /boot/refind_linux.confThis will append the partition information to the end of the refind_linux.conf file so we can just do some cursor trickery. Now enter
nano /boot/refind_linux.confand you will see the three boot lines, along with a fourth one with the info we need. Position your cursor under the P in PARTUUID like so:
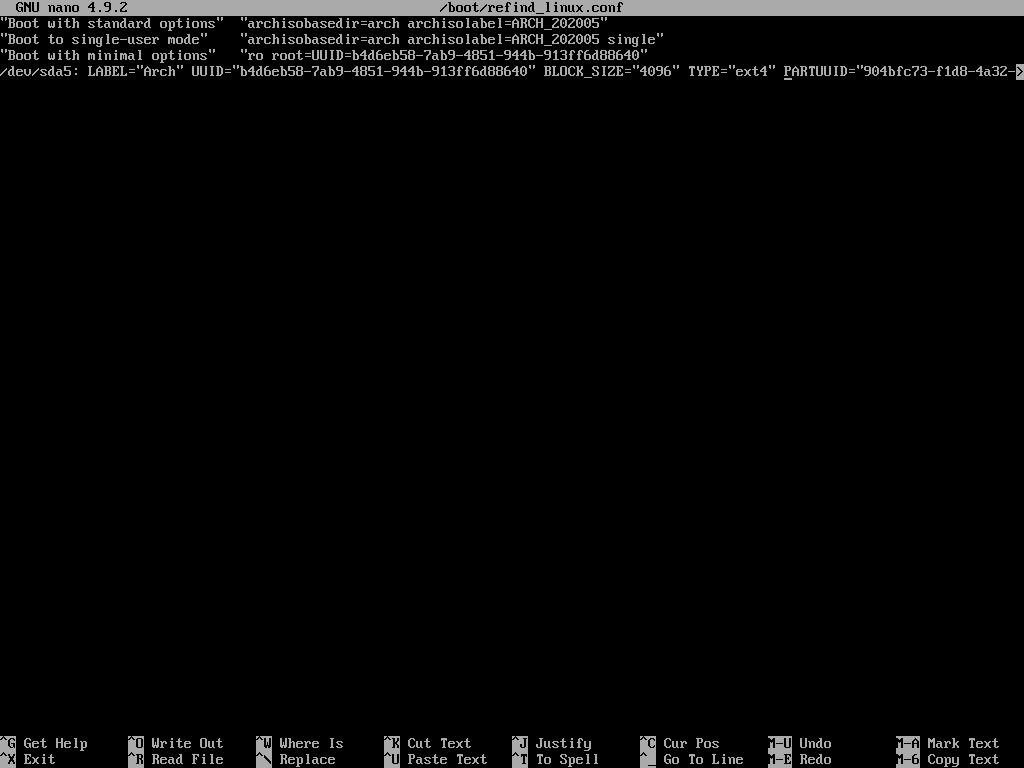
and press backspace to delete everything up to the second opening quotation mark on the first line:
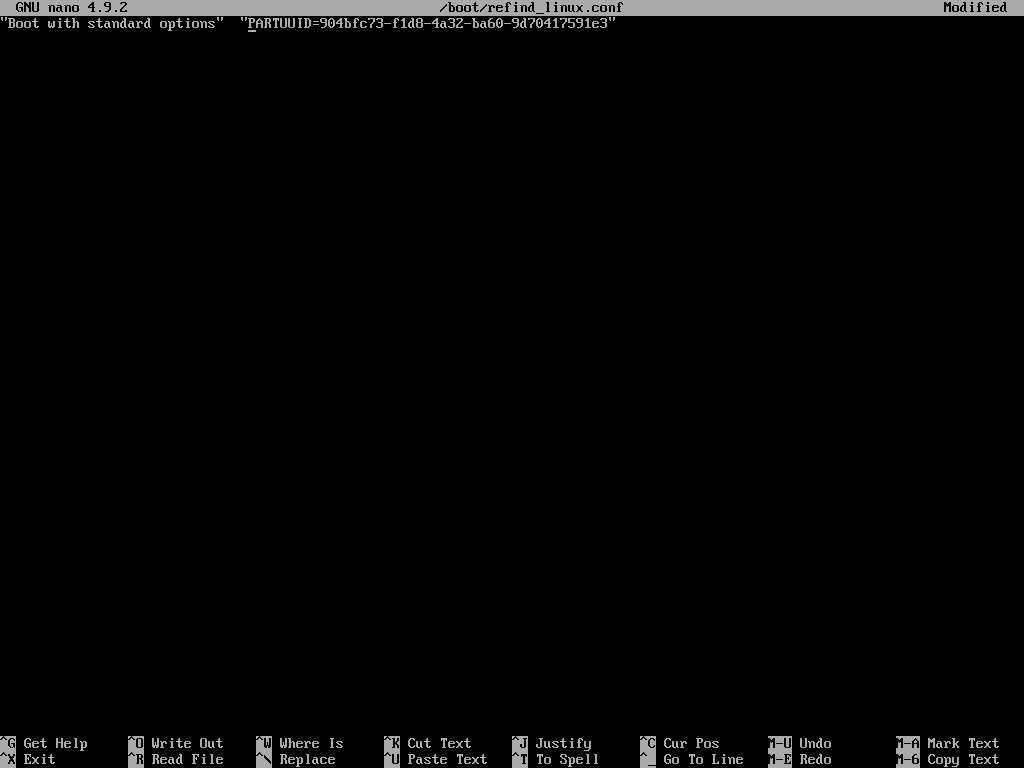
finally, edit the line so it looks like this:
"Boot using default options" "root=PARTUUID=xxx rw add_efi_memmap initrd=/boot/intel-ucode.img initrd=/boot/initramfs-linux.img"Of course, xxx stands for whatever your PARTUUID is set to, don’t change that part. here’s a poorly cropped look at mine:
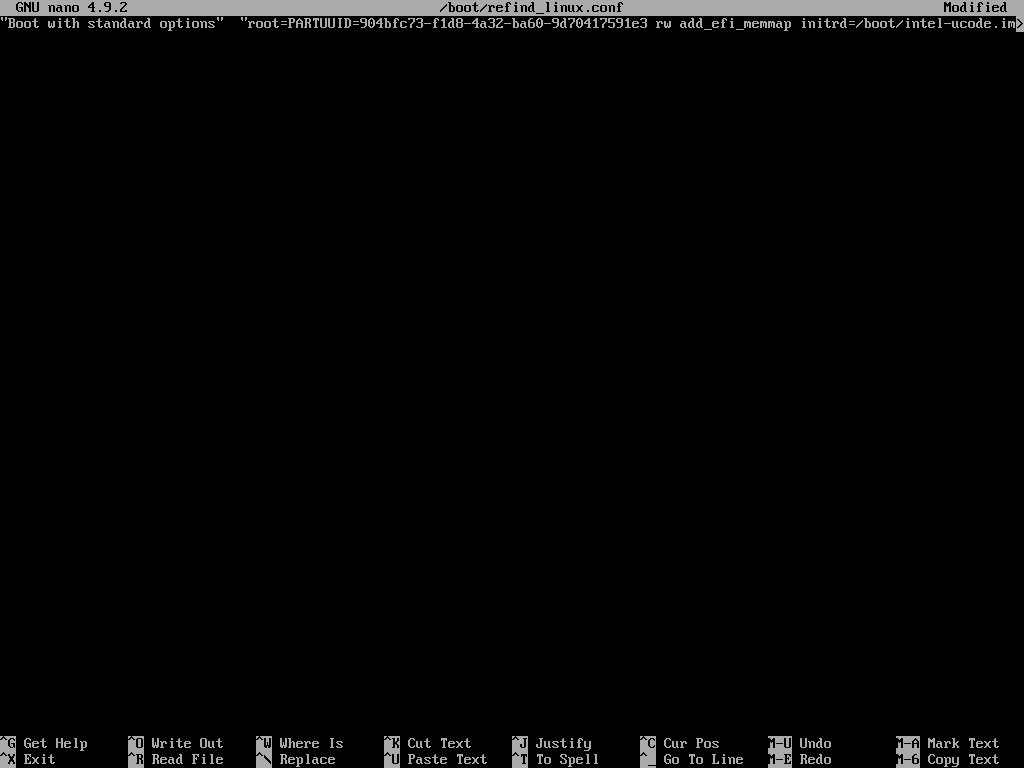
Remember to delete the quotation mark after the first = sign. It all has to be a long list of parameters inside one set of quotation marks.
Final touches
We’re almost done, but we still have a few little things to do. Create a password for the root user by entering
passwdand then entering a new password twice. Now set the computer’s name by entering
echo myComputerName > /etc/hostnamethen set up the hosts file by entering
nano /etc/hosts
and adding
127.0.0.1 localhost
::1       localhost
127.0.0.1 myComputerName
Now set up you regular user by installing sudo:
pacman -S sudoIt might already be installed, so after it’s done, create a new user by entering
useradd -m -G wheel,storage,power yourNewUserand then set a password:
passwd yourNewUserFinally, allow the wheel group to use sudo. Enter
EDITOR=nano visudo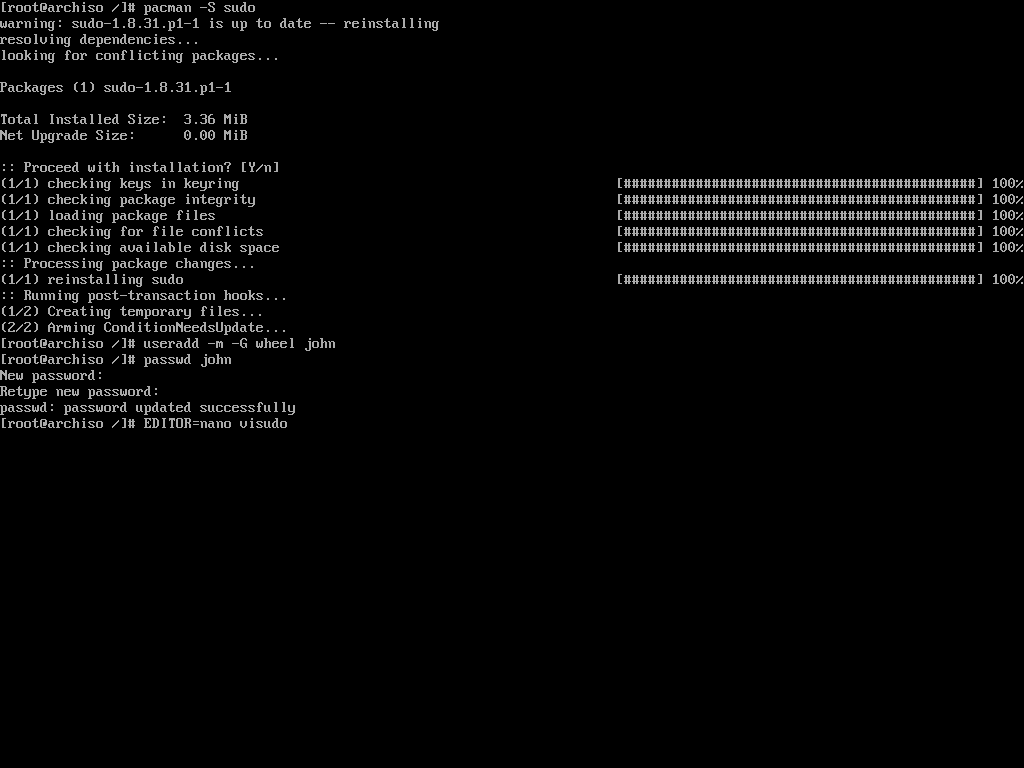
and scroll down to the line that says
# %wheel ALL=(ALL) ALLand uncomment it:
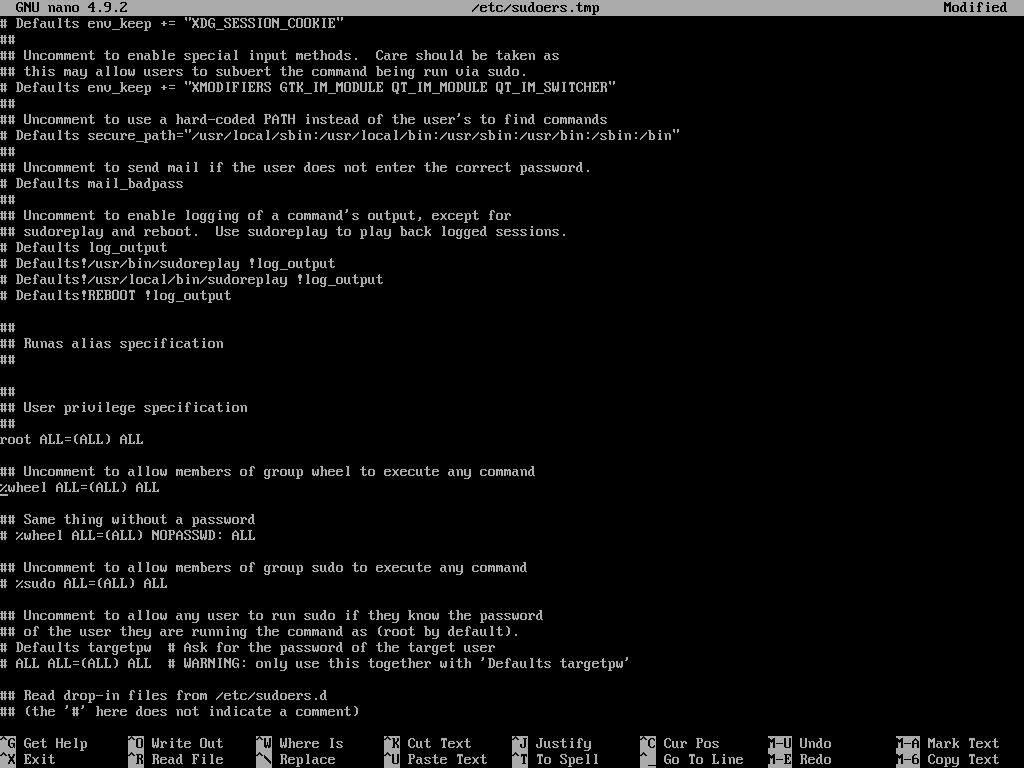
Save by pressing ctrl+o and enter, then ctrl+x to exit. With this we’re done and it’s finally time to install a graphical interface!
Install a desktop environment
First we need to install the video driver. Enter one of these depending on your video card:
# For AMD video cards
pacman -S xf86-video-amdgpu
# For ATI video cards
pacman -S xf86-video-ati
# For Intel video cards
pacman -S xf86-video-intel
# For nVidia video cards
pacman -S nvidia
Then install the video server:
pacman -S xorg xorg-serverAnd then the desktop environment:
pacman -S xfce4 xfce4-goodiesFinally, we need to install a greeter and configure it:
pacman -S lightdm lightdm-webkit2-greeterWhen this step is complete, enter
nano /etc/lightdm/lightdm.confand scroll down to the [Seat:*] section. Uncomment the greeter-session line and set it to lightdm-webkit2-greeter:
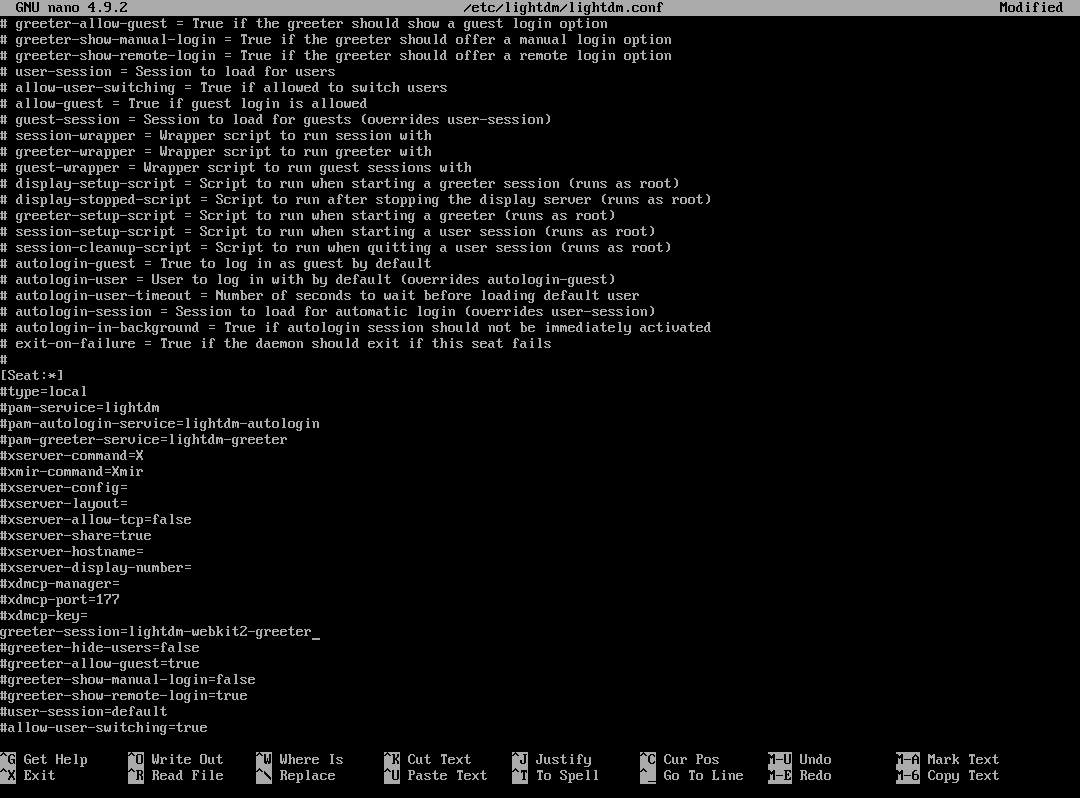
Again, press Ctrl+o and enter to save, then Ctrl+x to exit. As a last step, let’s install sound and networking:
pacman -S wpa_supplicant wireless_tools networkmanager nm-connection-editor network-manager-applet gnome-keyring pavucontrol pulseaudio alsa-utils gitAnd finally, enable networking:
systemctl enable NetworkManager.serviceand enable the graphical interface:
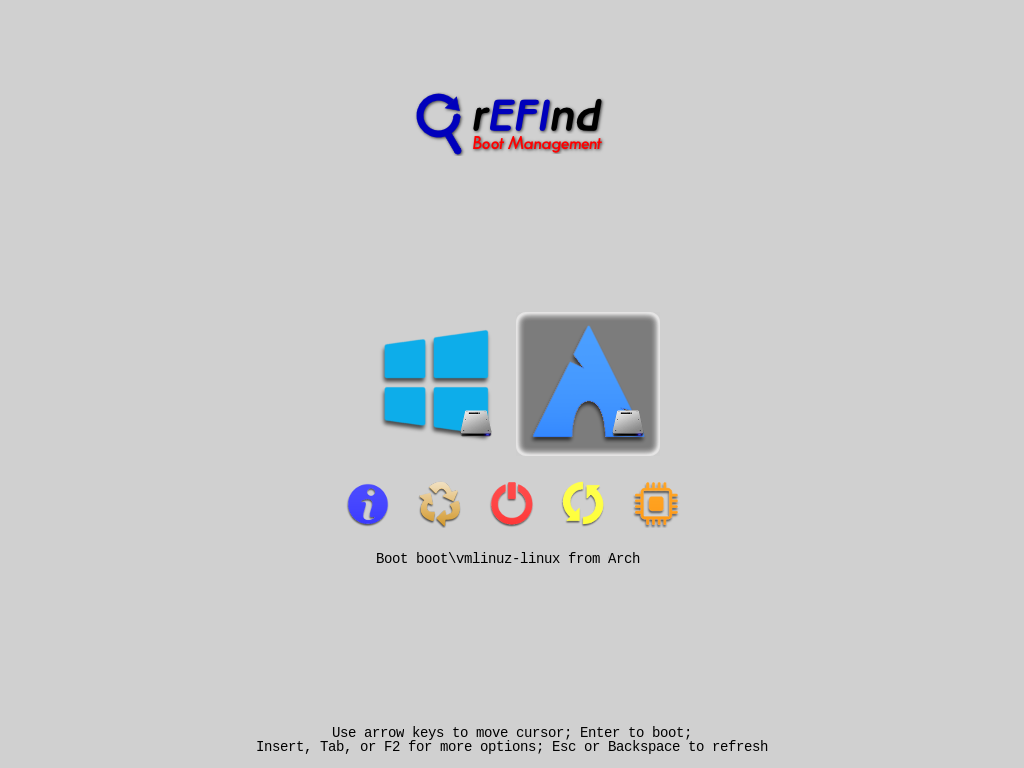
systemctl enable lightdm.serviceAnd with this, our Arch Linux installation is finally complete. Enter exit in your terminal to get back to the live environment and then enter shutdown now. Unplug your flash drive and turn your computer back on. We end up with a basic bootloader:
a basic greeter:
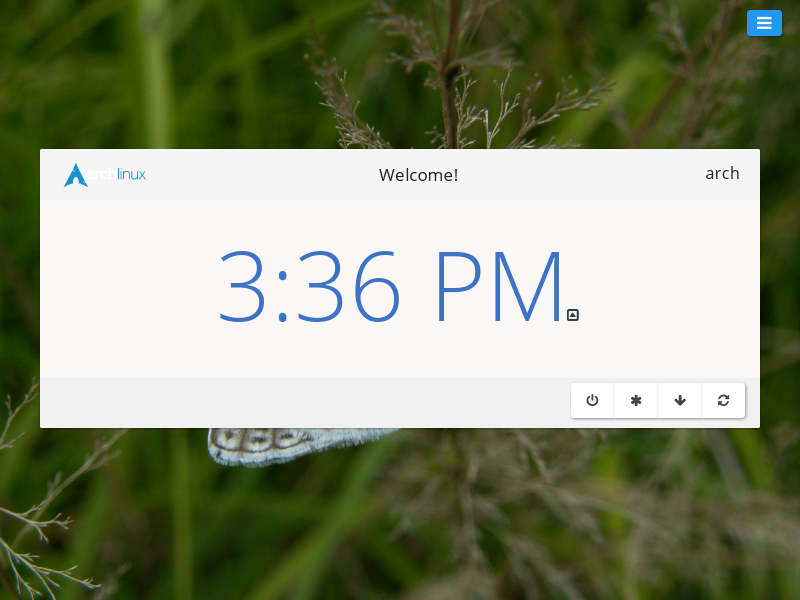
Click on the time to get started.
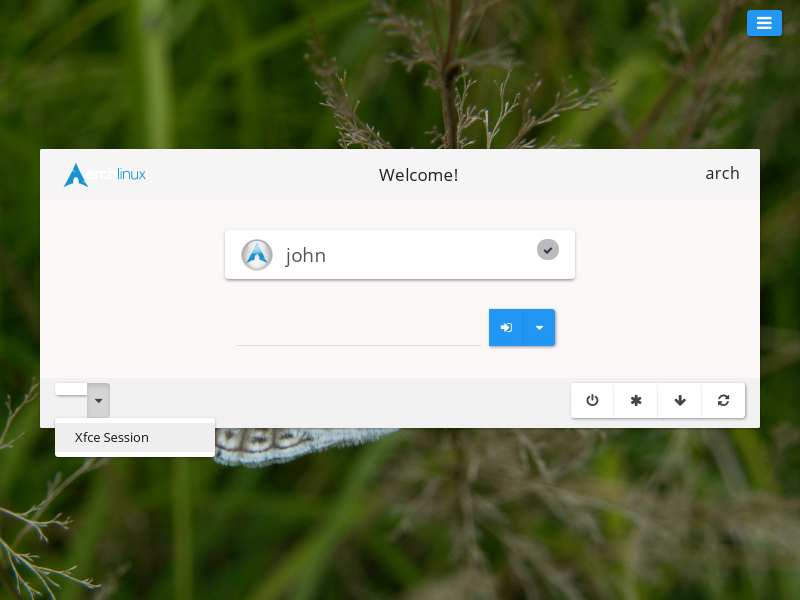
Click on the little arrow in the bottom left corner and select Xfce session
And a very basic desktop:
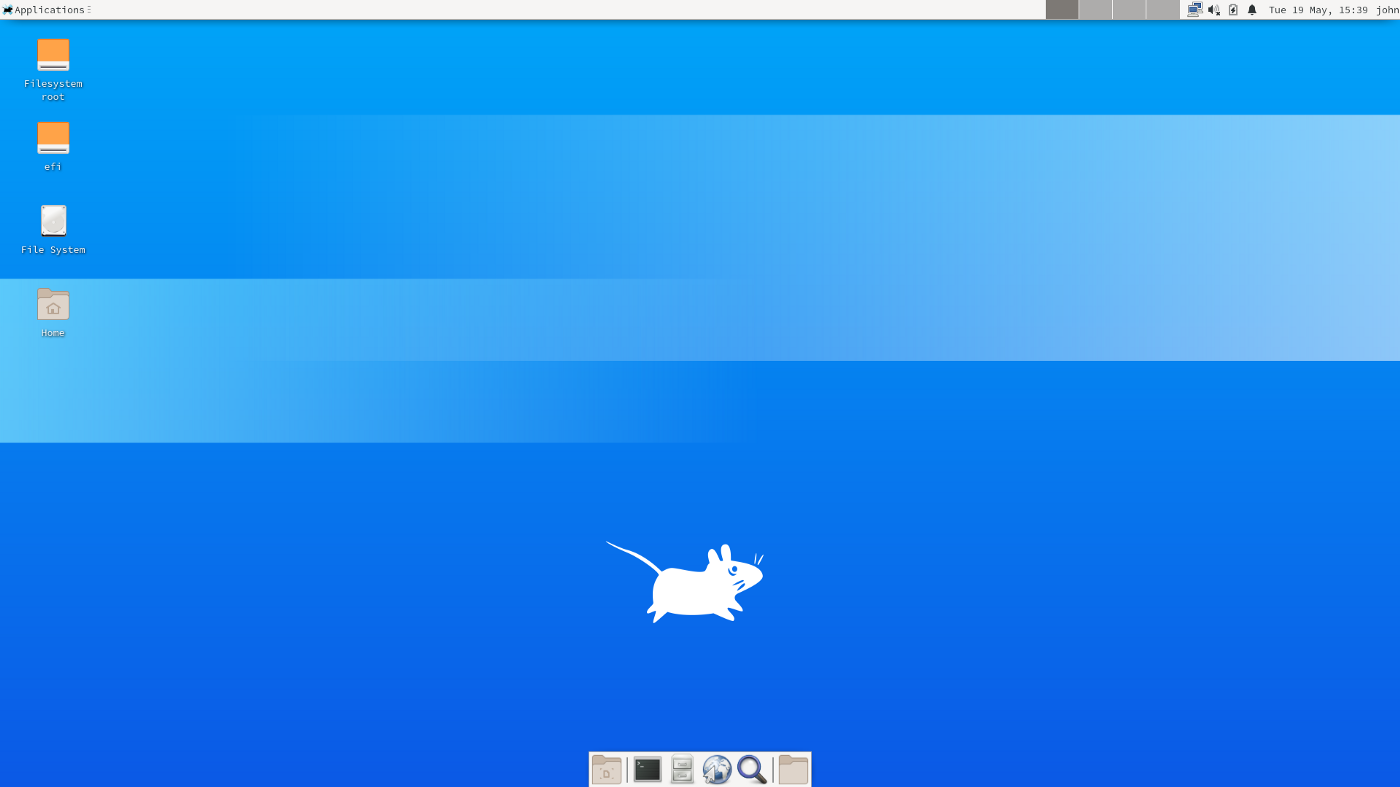
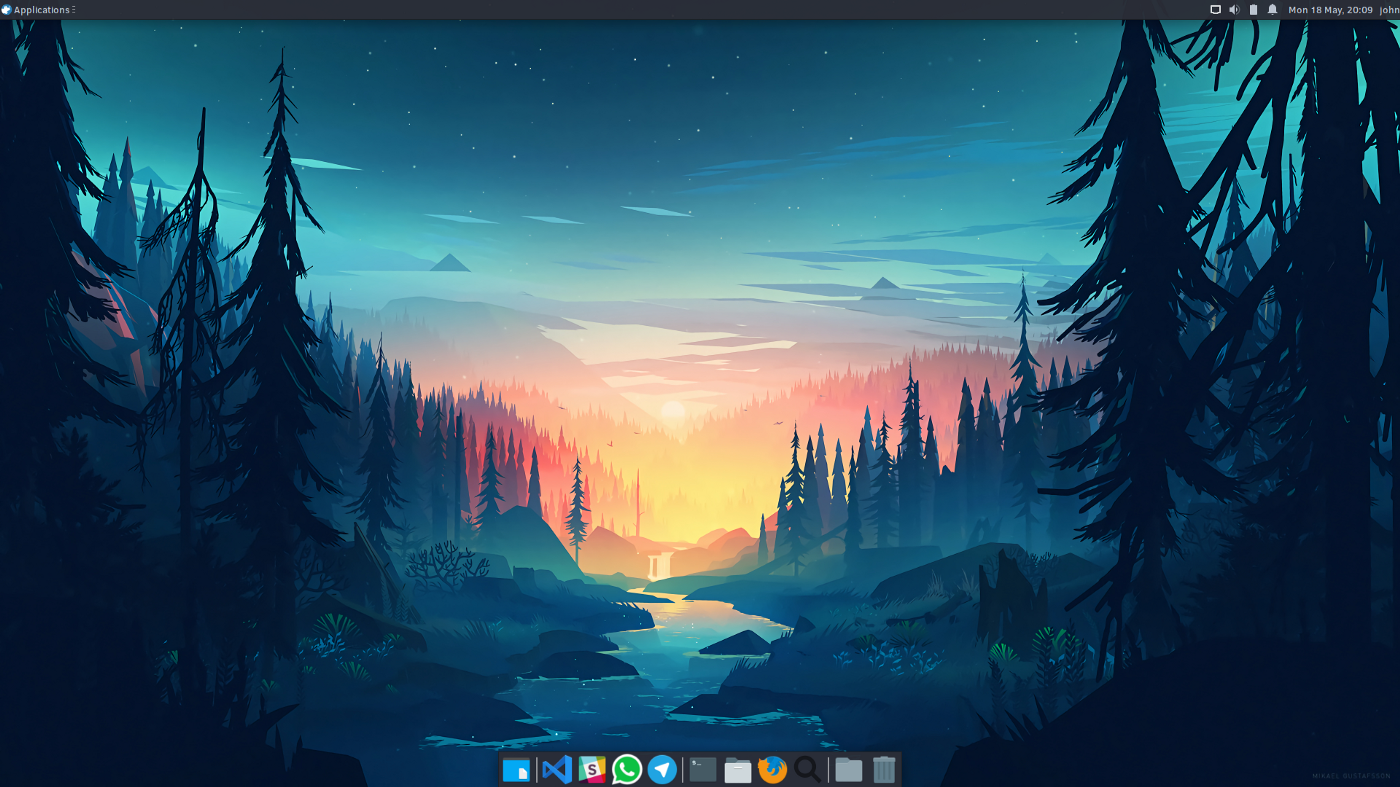
However, with a little bit of tinkering, we can make things look extremely slick. Here’s my rEFInd:

And here’s my desktop:
And my greeter:

Now remember the little arrow in the greeter screen? That means you’re not tied to any specific desktop environment. You could just go to your terminal and type:
sudo pacman -S deepinAnd have a completely different and awesome environment:
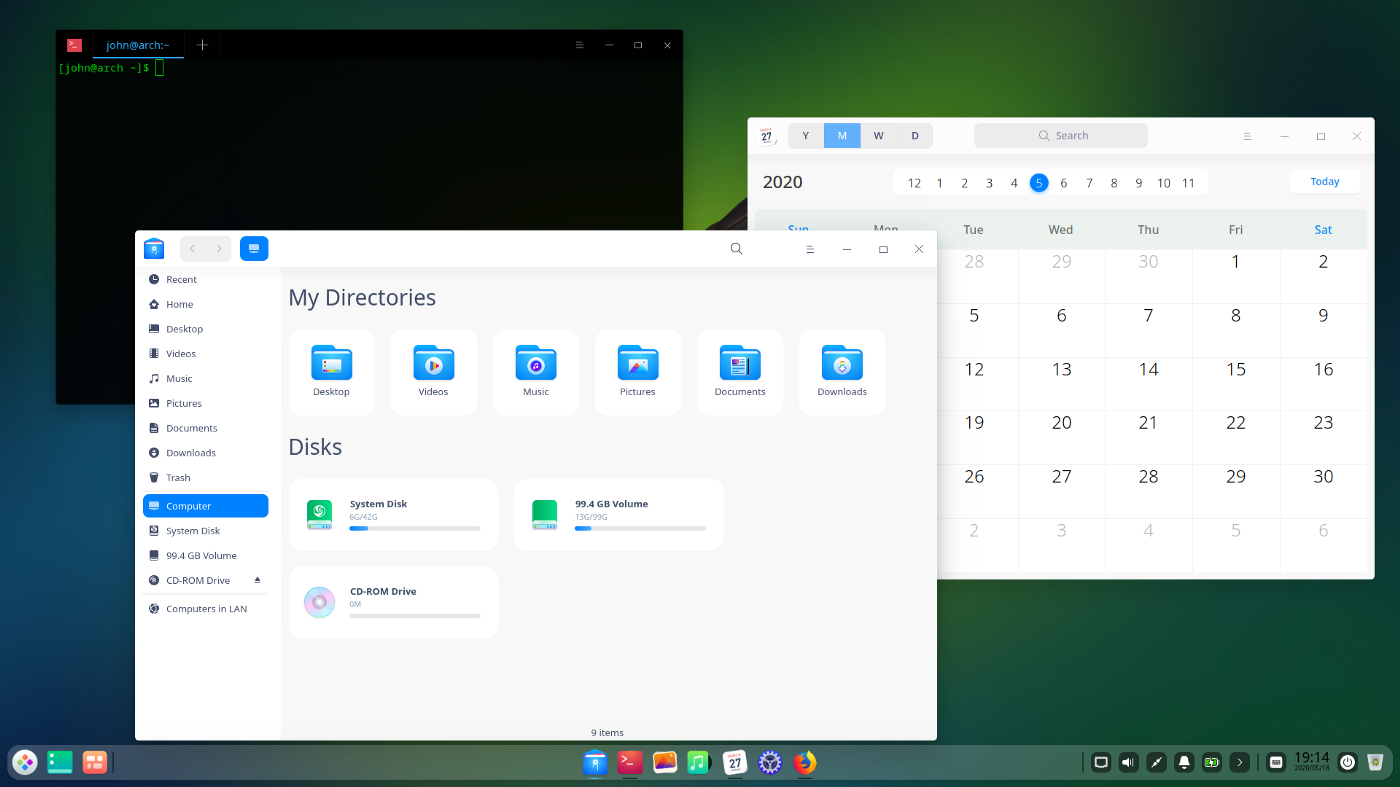
Other popular desktop environments include KDE, Gnome, Cinnamon, Budgie and many others!
Closing thoughts
There are a few other things you can install after you’re done. The most important one is yay. Yay is another package manager built for unofficial packages that don’t make it into the main Arch repository. To install it, enter
git clone https://aur.archlinux.org/yay.git
cd yay
makepkg -si
After this, if you find a package that is in the Arch User Repository (AUR), you just install it with
yay -S packageNameYou should definitely install VSCodium, which is an open source version of VSCode:
yay -S vscodium-binAnd the rest is pretty much up to you! Enjoy your new system!
UPDATE: click here for the final part!
