
How (and why) I migrated my personal site to WordPress
23 Sep 2019 - John
I love Medium. The exposure is great and the community is amazing, but I also need a space where I can post my resume, projects and contact information. I also wanted to mirror my Medium posts over there, so that’s why I went with WordPress.

Of all the tools and frameworks out there, you had to choose WordPress. Why?
Aside from the fact that there’s absolutely wrong with WordPress, the reasons were, for the most part, circumstancial. My site was originally developed in Jekyll, but as a broke engineer, I only had a Namecheap hosting account and $20 for a domain.
The problem is Namecheap’s shared plan doesn’t support Ruby apps, so I was running Jekyll locally and uploading the _site folder every time I updated my blog. Needless to say, I grew tired of it pretty quickly. I made a lot of WordPress wesites when I was in college, and since Namecheap mostly works with the LAMP stack, I decided this was a perfect opportunity to brush up on my PHP skills.
How I did it
I started with a clean WordPress install in my local environment. There, I created a folder called wp-johnfajardo inside the ./wp-content/themes folder. Then inside my theme folder, I created an ./src folder where I set up a quick Gulp pipeline to create my CSS styles via SCSS:
wp-johnfajardo // This is the theme root folder.
├── content-single.php
├── fonts
│   ├── icomoon.eot
│   ├── icomoon.svg
│   ├── icomoon.ttf
│   └── icomoon.woff
├── footer.php
├── functions.php
├── header.php
├── images
│   ├── profile.png
│   └── wave.jpg
├── index.php
├── lib
│   └── prettify
│       ├── lang-css.js
│       ├── lang-go.js
│       ├── lang-lua.js
│    [...]
│       ├── lang-yaml.js
│       ├── lang-yml.js
│       ├── prettify.css
│       ├── prettify.js
│       ├── run_prettify.js
│       └── skins
│           ├── desert.css
│           ├── doxy.css
│           ├── sons-of-obsidian.css
│           └── sunburst.css
├── page.php
├── screenshot.png
├── sidebar.php
├── single.php
├── src
│   ├── gulpfile.babel.js
│   ├── images
│   ├── package.json
│   ├── package-lock.json
│   └── scss
│       ├── fonts
│       └── style.scss
└── style.css
While it looks a bit intimidating, it’s really not that bad. Let’s ignore the .php files for a moment and go over the directory structure:
- The
./fontsfolder holds a set of icon fonts that I used for the phone and social media icons. - The
./imagesfolder has… well, the images my theme uses. - The
./libdirectory contains any external libraries. In my case, I’m using prettify for code highlighting. It’s been discontinued, but it’s still pretty popular and widely used. - And finally, the
./srcdirectory holds all my dev dependencies for my styling. It is not necessary to run a Gulp project for this, but I’m so used to write SASS, that plain CSS feels weird to me. This is a simplified version of the project from the Gulp post made for SASS only, so refer to the it for details on how to set it up.
The php files and the theme hierarchy
A WordPress theme revolves around it’s index.php file. It is the first file that is read when the page is loaded. However, it doesn’t contain a full page. Instead every section of the page resides in its own file and the index calls them as needed to assemble the page:
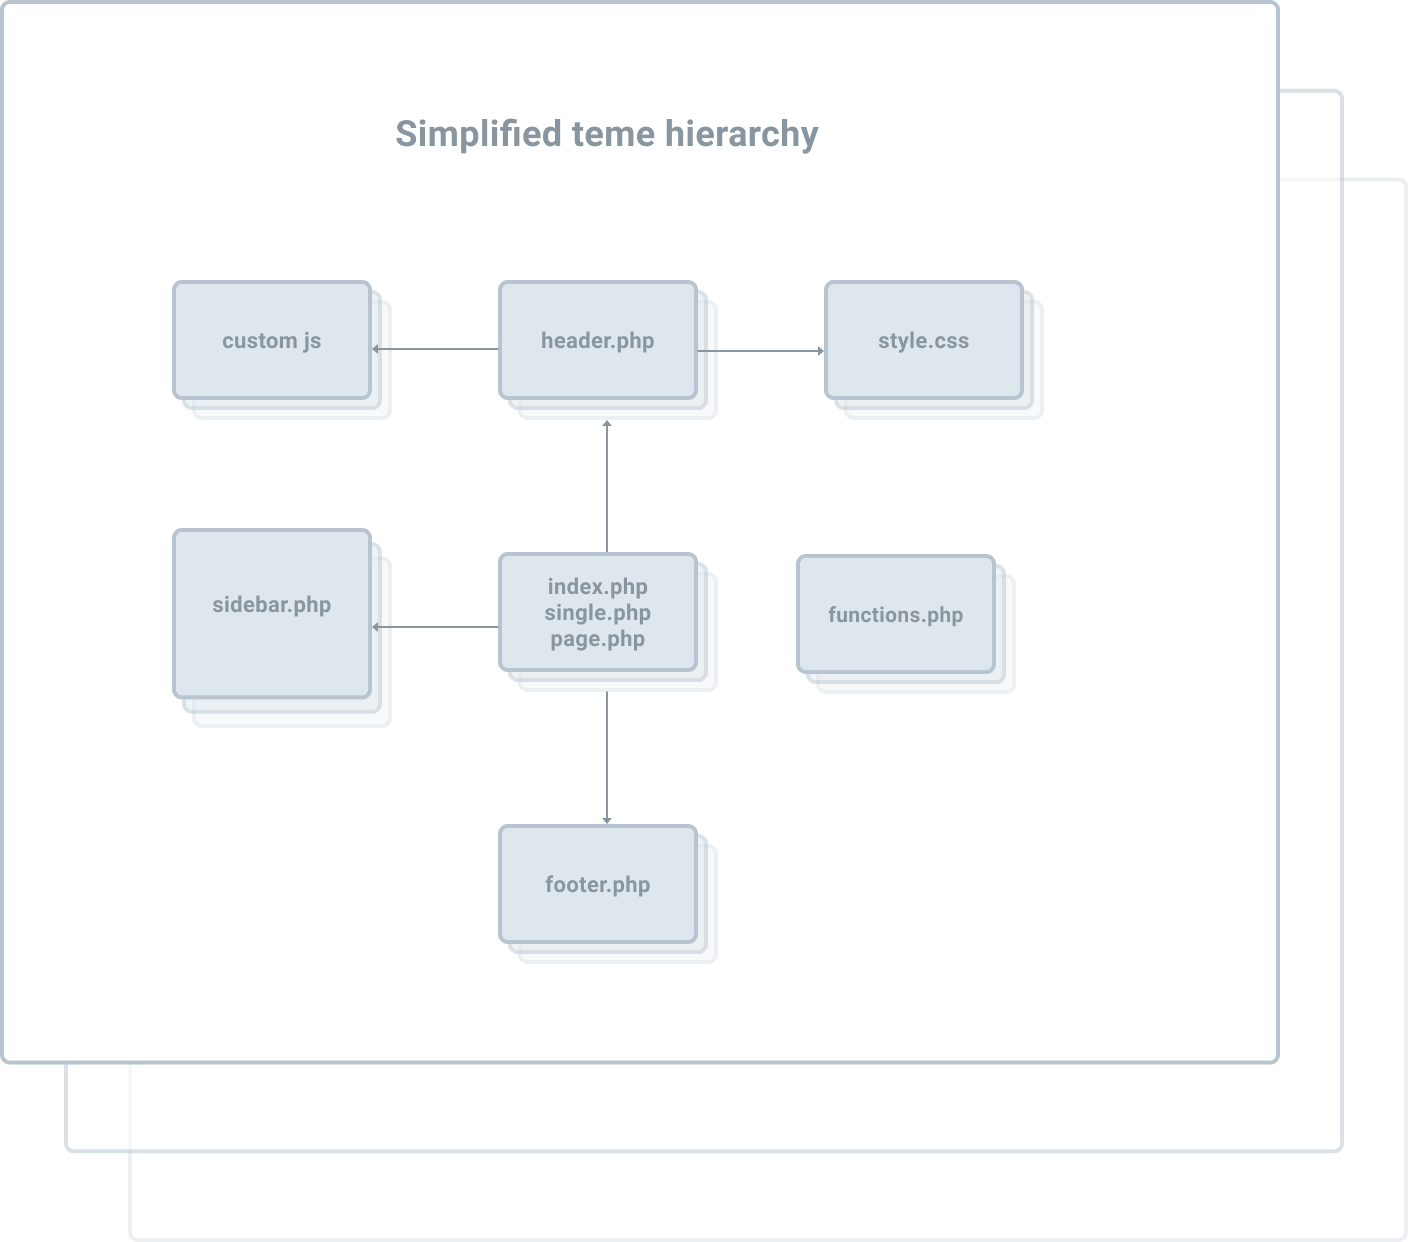
So with this knowldege, let’s take a look at the files in our project:
- The
index.phpfile, as explained earlier, is the main file and it loads all of the other ones. ./sidebar.phpand./footer.phpare self explanatory, they’re the other regions of the page.- There are different types of content in WordPress, you have regular blog posts and pages that are more static. You can define their looks individually with the files
./page.phpand./single.php. - The
./content-single.phpis called from within the./single.phpto further build our individual post page. If you’re into Rails, think about a#showview of sorts. - The
./style.cssis self explanatory. - Finally, we have the
./functions.phpfile. If you need to tweak the way WordPress does things by default, this is where you do it.
index.php
<?php get_header(); ?>

<div class="container">
    <?php get_sidebar(); ?>

    <div class="content">
        <h2 class="latest-posts">Latest posts</h2>
        <hr class="main-separator" />

        <?php while ( have_posts() ) : the_post(); ?>

        <article>
            <h3 class="post-title"><a href="<?php echo get_permalink(); ?>"><?php the_title(); ?></a></h3>
            <p class="metadata"><span class="icon-calendar"></span> <?php the_date();?> -  <span class="icon-user"> </span>  <?php the_author();?></p>
            <?php the_content(); ?>
        </article>

        <hr class ="separator" />
        <?php endwhile; ?>

        <?php get_footer(); ?>

    </div><!--  End content -->

</div> <!-- End container -->

</body>
</html>
This is the central part of the theme. It calls the header and the sidebar and then starts the "middle" section of the page, where it retrieves the posts from the database and then loops over the result to display the list of posts. It then gets the footer and that’s it.
header.php
<!DOCTYPE html>
<html lang="en">
<head>
    <meta charset="utf-8">
    <meta name="viewport" content="width=device-width, initial-scale=1, shrink-to-fit=no">
    <title><?php bloginfo( 'name' ); ?></title>
    <link href="https://fonts.googleapis.com/css?family=Lato|Roboto:400&display=swap" rel="stylesheet">
    <link rel="stylesheet" href="<?php bloginfo( 'stylesheet_url' ); ?>">
    <link rel="stylesheet" href="<?php echo get_stylesheet_directory_uri(); ?>/lib/prettify/skins/sunburst.css">
    <script src="<?php echo get_stylesheet_directory_uri(); ?>/lib/prettify/run_prettify.js"></script>
    <script>
        document.addEventListener('DOMContentLoaded', function() {
            var pres = document.querySelectorAll('pre');
            pres.forEach(pre => {
                pre.classList.add('prettyprint', 'sunburst')
            });
        });
    </script>
    <?php wp_head(); ?>
</head>
<body onload="PR.prettyPrint()">
This file initializes the header section of every page, calls all the relevant javascript and stylesheet files and in our case, initializes Prettify.
sidebar.php
<div class="navigation">
        <a href="<?php echo get_bloginfo('wpurl'); ?>" class="home-link"><img class="profile" src="<?php echo get_template_directory_uri(); ?>/images/profile.png" alt=""></a>
        <h1 class="title"><a href="<?php echo get_bloginfo('wpurl'); ?>">John Fajardo</a></h1>
        <p class="tagline">Software engineer</p>
        <nav>
            <!-- Walker -->
            <?php
                wp_nav_menu(array(
                    'container' => false,
                    'container_class' => false,
                    'container_id' => false,
                    'menu_class' => false,
                    'menu_id' => false,
                    'before' => '',
                    'after' => '',
                    'link_before' => '',
                    'link_after' => '',
                    'items_wrap' => '<ul class="nav-list">%3$s</ul>',
                    'walker'  => new Walker_Sidebar_Menu()
                ));
            ?>
            <!-- Walker -->
        </nav>
    </div><!--  End navigation -->
Pretty selft explanatory. Just a couple of links and a call to WordPress’s internal wp_nav_menu function to counstruct an unordered list of the links in our page.
footer.php
<?php post_pagination(); ?>I’m not using the footer for anything other than my post list pagination, so there’s the call for it.
single.php
<?php get_header(); ?>

<div class="container">
    <?php get_sidebar(); ?>

    <div class="content main-content">

    <div class="post-content">
        <?php
            while ( have_posts() ) : the_post();
                get_template_part( 'content', 'single' );
            endwhile;
        ?>
    </div>

    </div><!--  End content -->
</div> <!-- End container -->

</body>
</html>
This file gets loaded in place of ./index.php when we open a post. It’s basically the same, with the exception that instead of calling the lists of posts, it calls the ./content-single.php, which ultimately is the one that loads the posts that was clicked on.
content-single.php
<article class="post">
    <h1><?php echo the_title(); ?></h1>
    <p><span class="icon-calendar"></span> 23 Sep 2019 -  <span class="icon-user"> </span>  John</p>
    <hr class="post">
    <?php echo the_content(); ?>
</article>
This is the file that actually does the rendering for individual posts. I could’ve done it in the ./single.php file, but I opted to keep it separate in case I decide to make it bigger in the future.
page.php
<?php get_header(); ?>

<div class="container">
    <?php get_sidebar(); ?>

    <div class="content">

        <?php while ( have_posts() ) : the_post(); ?>

        <article>
            <?php the_content(); ?>
        </article>

        <hr class ="separator" />
        <?php endwhile; ?>

        <?php get_footer(); ?>

    </div><!--  End content -->

</div> <!-- End container -->

</body>
</html>
This is not very DRY of WordPress, but here we are. Again, we have a file that not only resembles the ./index.php file, but that also gets loaded in its place, this time when a page is clicked.
functions.php
This is where I made my different customizations, let’s go through them:
function johnsReadMore() {
    return '<a class="read-more" href="' . get_permalink() . '">Read More...</a>';
}

add_filter( 'the_content_more_link', 'johnsReadMore' );
I didn’t like the default "read more" link so I built a simple funcion that returns it with the markup I wanted and then replaced the default one with the the_content_more_link hook.
function custom_sidebar() {

    $args = array(
        'id'            => 'primary',
        'name'          => __( 'Primary' ),
        'description'   => __( 'Appears on posts and pages in the sidebar.', 'text_domain' ),
        'before_title'  => '',
        'after_title'   => '',
        'before_widget' => '<li>',
        'after_widget'  => '</li>',
    );
    register_sidebar( $args );
}

add_action( 'widgets_init', 'custom_sidebar' );

register_nav_menus(
    array('my_theme_sidebar_menu' => 'Sidebar Menu' )
);

// Sidebar links
class Walker_Sidebar_Menu extends Walker {

    var $db_fields = array(
        'parent' => 'menu_item_parent',
        'id'     => 'db_id'
    );

    function start_el( &$output, $item, $depth = 0, $args = array(), $id = 0, $current_object_id = 'active' ) {
        $output .= sprintf( "\n<li class=\"menu-link\"><a href='%s'%s>%s</a></li>\n",
            $item->url,
            ( $item->object_id === get_the_ID() ) ? ' class="active"' : '',
            $item->title
        );
    }
}
Then I did the same with the sidebar. I created a new one with my preferred options. Since this is custom functionality, I registered it as an action and not a filter. Then I extended the Walker class to add my markup.
if ( ! function_exists( 'post_pagination' ) ) :
    function post_pagination() {
        global $wp_query;
        $pager = 999999999; // need an unlikely integer

        $paginate_links = paginate_links( array(
            'base' => str_replace( $pager, '%#%', esc_url( get_pagenum_link( $pager ) ) ),
            'format' => '?paged=%#%',
            'current' => max( 1, get_query_var('paged') ),
            'prev_text' => __('<<'),
            'next_text' => __('>>'),
            'type' => 'list',
            'total' => $wp_query->max_num_pages
        ));
        $paginate_links = str_replace( "<ul class='page-numbers'>", "<ul class='pagination'>", $paginate_links );
        if ( $paginate_links ) {
            echo $paginate_links;
        }
    }
endif;
And finally, I create a pagination function in which, again, I specified my desired markup, but this time it doesn’t need to be registered. Instead, it’s called directly in the ./footer.phpfile.
And this is pretty much all there is to making custom WordPress themes. We tok a very quick glance at it, but the workflow is largely the same: find somthing you don’t like, consult the themes documentation and change it.
I hope this post has been useful for you and if you’re interested, click here to check the live version and here for the repository.